CCXProcess.exe and its purpose
Contents
CCXProcess.exe (Creative Cloud Experience Process) is a name of a process that is part of the Adobe Creative Cloud software set. Its purpose is to provide a range of features for Adobe CC applications on both Windows and Mac, such as templates, filters, and even tutorials, also to move between apps seamlessly. This process launches on computer startup and typically creates multiple instances of cscript.exe or conhost.exe processes.
Naturally, noticing processes with unclear names that may use low or very high percentage of CPU often triggers a question whether these processes are necessary, or can be disabled easily. Our research shows that multiplication of process names can be related to the antivirus you’re using, and explain how to apply a workaround for the issue.
However, this process can be a disguised malware variant, so if you noticed it in Task Manager, you must verify its security first. For example, if you do not use any of Adobe applications, it might be a sign that it is not a genuine process that’s running on your computer.
To begin with, CCXProcess.exe is an executable file that originates from Adobe Creative Cloud software suite. Since this software is a bundle of graphic design, video editing, photography and web developments applications along with cloud services, the process itself can originate from one of the following programs:
- Adobe Premiere Pro;
- Adobe After Effects;
- Adobe Lightroom Classic CC;
- Adobe Muse;
- Adobe Flash Builder;
- Adobe Systems;
- Adobe Lightroom Classic;
- Adobe Extension Manager CC;
- Adobe.

Is CCXProcess safe or virus?
Legitimate and digitally signed version of CCXProcess.exe file typically can be found in this computer folder – C:\Program Files (x86)\Adobe\Adobe Creative Cloud Experience. In general, the size of this file varies between 144,008 bytes and 679,048 bytes.
According to user reports, disabling this process doesn’t do any harm, so it can be said that it isn’t exactly necessary to keep it enabled. Additionally, users report that multiple cases of this process appear due to compatibility conflict with AVG or Trend Micro Antivirus solutions.
It is important to note that this executive does not have its own graphical user interface. This can seem suspicious as the user cannot easily identify what this process is doing on the computer. Besides, you have to be careful because there are some known Trojan or crypto-currency miner versions hiding behind identical name of CCXProcess.exe. As a matter of fact, various viruses tend to disguise themselves by using legitimate process names to deceive the victim.
You should check for these red signs signaling about a possible malware infection:
- You notice CCXProcess.exe on your computer even if you do not have any of Adobe programs installed.
- Right-click the said process in Windows Task Manager and choose Open File Location. If this takes you to a folder that has nothing to do with Adobe, scan with anti-malware immediately.
- You notice a severe system slowdown ever since the suspicious process appeared on your computer.
- You have recently downloaded some illegal files (torrents) or used software cracks lately.
To identify whether the file is malicious or not, you should run a scan with malware removal tool of your choice. Our team recommends using INTEGO Antivirus for virus removal on Windows. After that, we recommend scanning with RESTORO to repair virus damage caused on Windows OS.
| Name | CCXProcess.exe |
| Type | Executive file; helper process |
| Compatibility | Windows, Mac |
| Related processes | cscript.exe, conhost.exe |
| Related software | Adobe Creative Cloud (including Premiere Pro, After Effects, Lightroom Classic CC, Muse, Flash Builder, Systems, Lightroom Classic, Adobe Extension Manager CC). |
| Associated malware | This process can be malicious, as the name is used by cryptocurrency miners and Trojans. |
| Location path | C:\Program Files (x86)\Adobe\Adobe Creative Cloud Experience or any Adobe folder under C:\Program Files (x86)\ |
| Damage | Legitimate process might slow the computer down. Malicious variant can use your PC’s resources to mine cryptocurrency or steal your data |
| Removal | Remove malicious virus using INTEGO Antivirus or another AV and repair virus damage using RESTORO. If dealing with legitimate process, you can disable CCXProcess.exe using instructions given below. |

Intego Antivirus for Windows
Award-winning antivirus solution for your PC.
Robust security software that provides robust 24/7 real-time protection, Web Shield that stops online threats/malicious downloads, and Prevention engine that wards off Zero-Day threats. Keep your PC safe and protected against ransomware, Trojans, viruses, spyware and other forms of dangerous programs.
How to disable CCProcess.exe?
As mentioned earlier, legitimate version of this process is safe and might appear due to conflict with AVG or another antivirus solution. In such scenario, you can safely disable CCXProcess.exe using instructions given below.
- Press Windows key + R at the same time to launch Run prompt.
- Type regedit and press OK or Enter.
- In User Account Control window, press Yes.
- Now, open Registry folders (keys) in the following order:
HKEY_LOCAL_MACHINE>SOFTWARE>Policies>Adobe. - Here, right-click the Adobe name and choose New Key. Give it CCXWelcome name.

- Now, right-click CCXWelcome key (folder) you just created and choose New DWORD (32-bit) Value.

- Name it Disabled. Double click it.
- Set its value to 0 (zero) and click OK.

And that’s it! You have successfully disabled CCXProcess.exe on your computer.
Remove CCXProcess on Mac
CCXProcess can also cause high CPU usage on Mac. On this operating system, the file resides under Adobe Creative Cloud Content Manager name. Some users have reported the usage being so high that their Mac fans started revving. Some users reported that updating to a newer Adobe CC version resolved the issue for them. However, another method is to remove CCXProcess from your Mac. Here’s how to do it:
- Open Finder and go to Applications folder.
- Here, navigate to Utilities > Adobe Creative Cloud Experience. You will see a folder named CCXProcess here. Right-click it and choose Move to Bin.

- Now, right-click Bin and choose Empty Bin.
NOTE. If you receive a message that files could not be deleted because they are in use, here’s how to stop CCXProcess on Mac: - Open Activity Monitor on Mac (from Utilities folder), go to Memory tab and find Adobe Creative Cloud Experience (CCXProcess) here. Click it and choose the button with X symbol to stop it. Now, repeat steps 1-3.

If you suspect that the said process is a residing malware, you should take immediate actions to remove CCXProcess.exe virus from the system. We have prepared a malware removal guide down below.
Once CCXprocess.exe removal is complete, we strongly recommend scanning with popular PC repair software like RESTORO to complete after-care and virus damage repair.
OUR GEEKS RECOMMEND
Our team recommends removing malware using a professional antivirus software.
REMOVE THREATS WITH ROBUST ANTIVIRUS

Get INTEGO ANTIVIRUS for Windows to remove ransomware, Trojans, adware and other spyware and malware variants and protect your PC and network drives 24/7. This VB100-certified security software uses state-of-art technology to provide protection against ransomware, Zero-Day attacks and advanced threats, Intego Web Shield blocks dangerous websites, phishing attacks, malicious downloads and installation of potentially unwanted programs.
Use INTEGO Antivirus to remove detected threats from your computer.
GeeksAdvice.com editors select recommended products based on their effectiveness. We may earn a commission from affiliate links, at no additional cost to you. Learn more.
CCXProcess.exe Removal Guidelines
Method 1. Enter Safe Mode with Networking
Step 1. Start Windows in Safe Mode with Networking
Before you try to remove the virus, you must start your computer in Safe Mode with Networking. Below, we provide the easiest ways to boot PC in Safe Mode with Networking, but you can find additional ones in this in-depth tutorial on our website – How to Start Windows in Safe Mode. Also, see a video tutorial on how to start Windows in Safe Mode:
Instructions for Windows XP/Vista/7 users
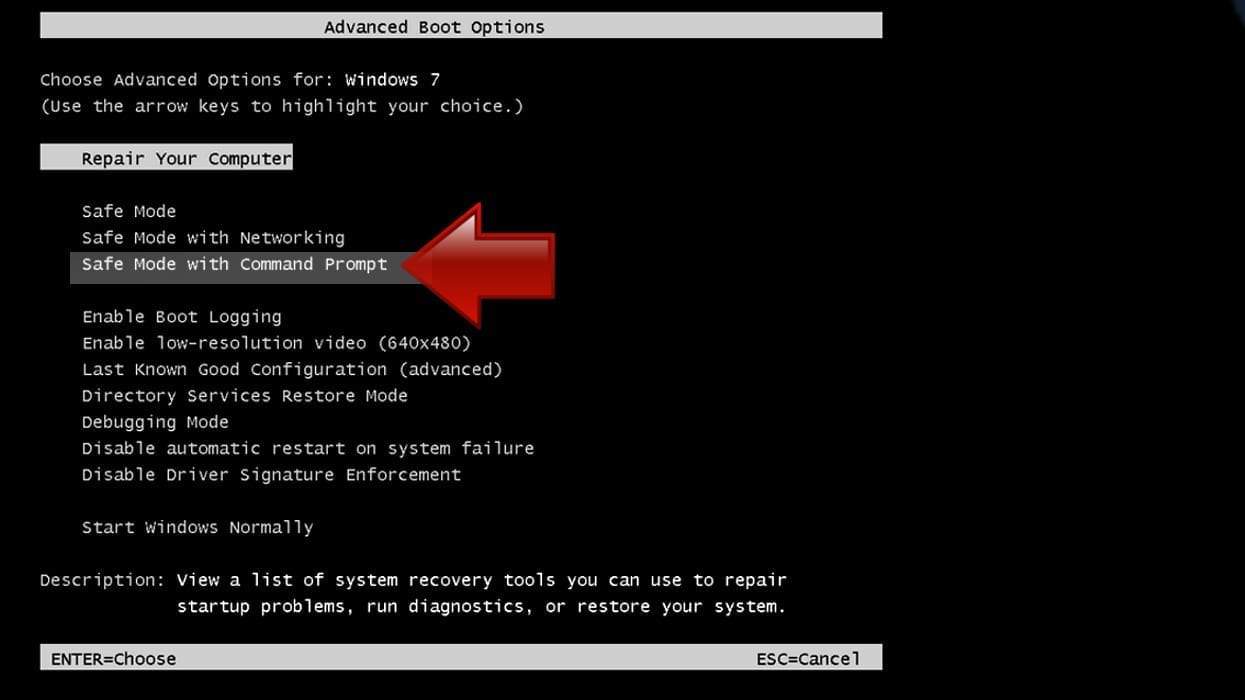
- First of all, turn off your PC. Then press the Power button to start it again and instantly start pressing F8 button on your keyboard repeatedly in 1-second intervals. This launches the Advanced Boot Options menu.
- Use arrow keys on the keyboard to navigate down to Safe Mode with Networking option and press Enter.

Instructions for Windows 8/8.1/10 users
- Open Windows Start menu, then press down the Power button. On your keyboard, press down and hold the Shift key, and then select Restart option.

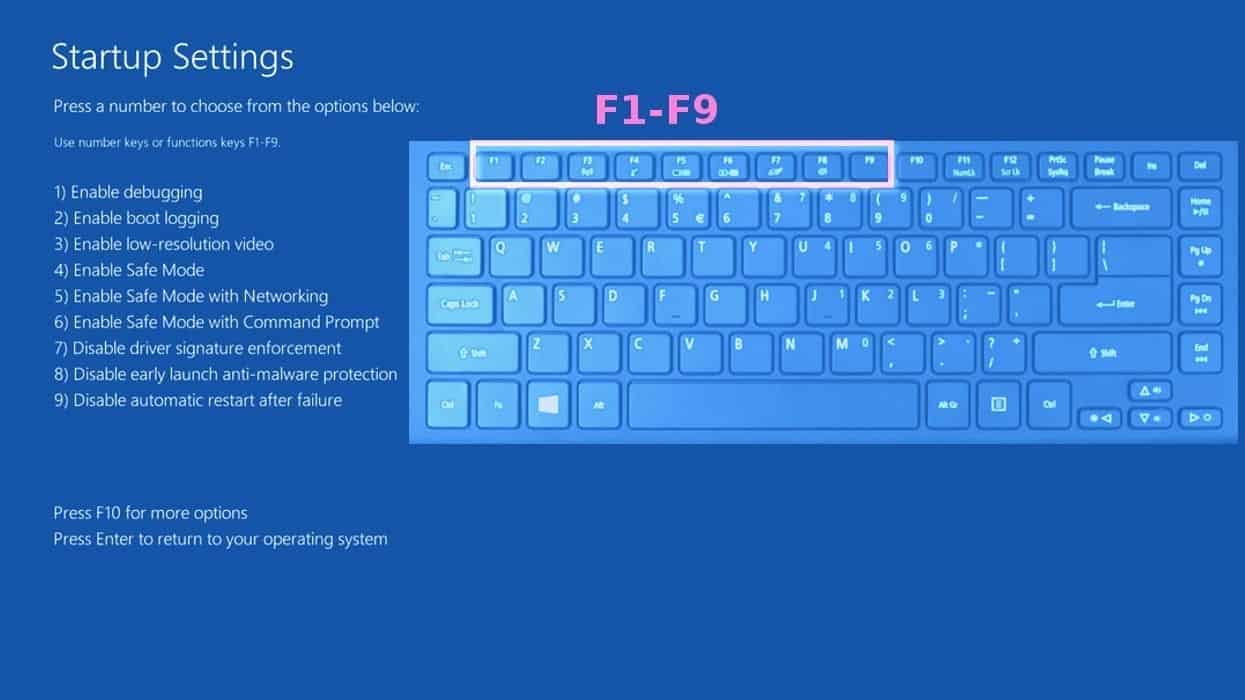
- This will take you to Windows Troubleshoot screen. Choose Troubleshoot > Advanced Options > Startup Settings > Restart. Tip: If you can't find Startup Settings, click See more recovery options.

- In Startup Settings, press the right key between F1-F9 to enter Safe Mode with Networking. In this case, it is the F5 key.
Step 2. Remove files associated with the virus
Now, you can search for and remove CCXProcess.exe files. It is very hard to identify files and registry keys that belong to the virus, Besides, malware creators tend to rename and change them repeatedly. Therefore, the easiest way to uninstall such type of a computer virus is to use a reliable malware removal program. We recommend using SYSTEM MECHANIC ULTIMATE DEFENSE , which can also restore deleted files. Additionally. we recommend repairing virus damage using RESTORO.
Special Offer
Compatibility: Microsoft Windows
See Full Review
RESTORO is a unique PC Repair Tool which comes with an in-built Avira scan engine to detect and remove spyware/malware threats and uses a patented technology to repair virus damage. The software can repair damaged, missing or malfunctioning Windows OS files, corrupted DLLs, and more. The free version offers a scan that detects issues. To fix them, license key for the full software version must be purchased.
Method 2. Use System Restore
In order to use System Restore, you must have a system restore point, created either manually or automatically.
Step 1. Boot Windows in Safe Mode with Command Prompt
Instructions for Windows XP/Vista/7 users
- Shut down your PC. Start it again by pressing the Power button and instantly start pressing F8 button on your keyboard repeatedly in 1-second intervals. You will see Advanced Boot Options menu.
- Using arrow keys on the keyboard, navigate down to Safe Mode with Command Prompt option and press Enter.
Instructions for Windows 8/8.1/10 users
- Launch Windows Start menu, then click the Power button. On your keyboard, press down and hold the Shift key, and then choose Restart option with the mouse cursor.
- This will take you to Windows Troubleshoot screen. Choose Troubleshoot > Advanced Options > Startup Settings > Restart. Tip: If you can't find Startup Settings, click See more recovery options.
- In Startup Settings, press the right key between F1-F9 to enter Safe Mode with Command Prompt. In this case, press F6 key.
Step 2. Start System Restore process
- Wait until system loads and command prompt shows up.
- Type cd restore and press Enter, then type rstrui.exe and press Enter. Or you can just type %systemroot%system32restorerstrui.exe in command prompt and hit Enter.

- This launches System Restore window. Click Next and then choose a System Restore point created in the past. Choose one that was created before the malware infiltration.
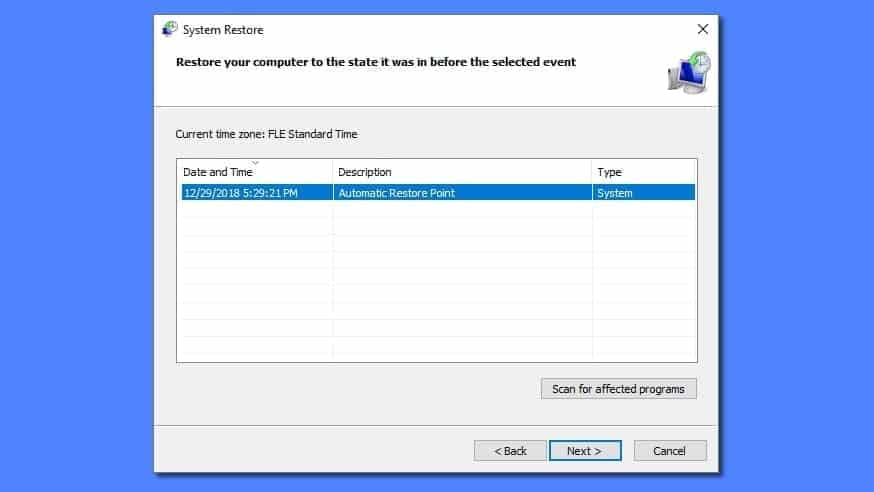
- Click Yes to begin the system restoration process.
After restoring the system, we recommend scanning the system with antivirus or anti-malware software. In most cases, there won't be any malware remains, but it never hurts to double-check.
Disclaimer. This site includes affiliate links. We may earn a small commission by recommending certain products, at no additional cost for you. We only choose quality software and services to recommend.

Norbert Webb is the head of Geek’s Advice team. He is the chief editor of the website who controls the quality of content published. The man also loves reading cybersecurity news, testing new software and sharing his insights on them. Norbert says that following his passion for information technology was one of the best decisions he has ever made. “I don’t feel like working while I’m doing something I love.” However, the geek has other interests, such as snowboarding and traveling.
Thanks for the guidance sir!