How to Start Windows in Safe Mode (2022 Guide)

Start Windows in Safe Mode to narrow down the source of the problem
Contents
Windows Safe Mode is a diagnostic Windows environment that starts the operating system only with essential services, programs and drivers. Booting in this mode is a typical step before troubleshooting security related problems, remove viruses, fix errors and other issues. You can choose between basic, Networking or Command Prompt mode based on tasks you need to complete.
Booting Windows in Safe Mode starts the operating system with a limited set of programs, drivers and services. If the error does not occur in the secure mode, it means that the problem is not caused by default Windows programs, devices or settings. For this reason, booting in this mode is often used when fixing common errors such as Your PC ran into a problem and needs to restart or Video_Scheduler_Internal_Error.

Earlier, the most popular way to start Windows in Safe Mode while booting was clicking F8, but that is not the case nowadays. Therefore, it is essential to learn the new ways to start Windows in Safe Mode on Dell, HP and other PCs.
The mode is available in several options, and each one is used to address different issues, each listed below.
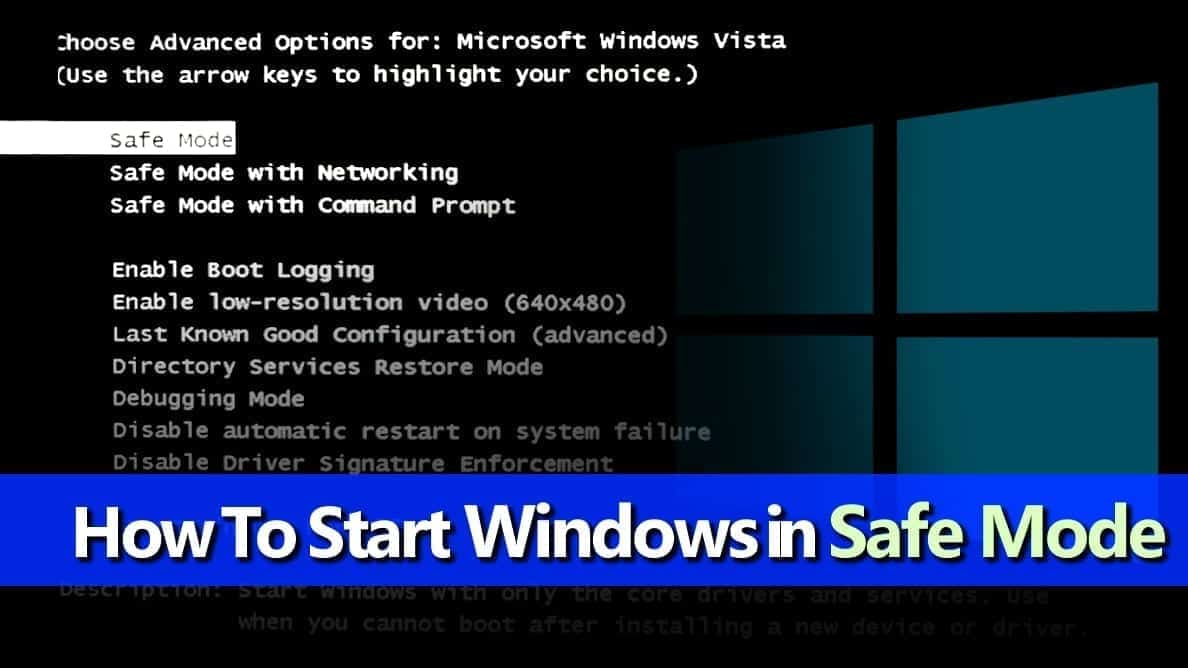
- Safe Mode. Starts the computer with core drivers and services.
- Safe Mode with Networking. Starts the PC with core drivers and services plus adds those needed for Internet connection to work. It is extremely useful when you think you’ll need a troubleshooter or Internet access to download necessary files or updates.
- Safe Mode with Command Prompt. This mode comes in handy when the taskbar, Desktop or Start menu doesn’t load at all.
There are many ways to boot Windows in the said mode. However, options for different versions of the Windows operating system are slightly different. Therefore, we suggest seeing instructions prepared exceptionally for your Microsoft Windows version (7/Vista/XP, Windows 8 & 8.1, Windows 10 and Windows 11). You can also check the video guide we provide.
How to Start Windows in Safe Mode on Windows 11, 10, 8, 8.1, 7, Vista, or XP?
Boot in Safe Mode on Windows XP/Vista/7
In case you are running one of these older versions of Windows, then your solution includes using the good old F8 key.
- Push the power button to turn on your PC. Immediately start pressing the F8 key in 1-second intervals. Keep pressing the key repeatedly. Wait until your computer displays hardware information and starts a memory test. Then you will see the Advanced Boot Options menu on your screen.
- Here, you will need to navigate using arrow keys on your keyboard. Choose to start Windows in Safe Mode (basic, with Networking or with Command prompt). Press Enter to confirm.
- Wait until the operating system starts. Do whatever you were willing to do in the described computer mode, and to go back to the normal mode, repeat steps 1-3 but choose Start Windows Normally instead. Press Enter to confirm.
Note. You can also try using Shift+F8 keys together. Keep pressing them both down repeatedly as described previously.
Start Windows in Safe Mode (Windows 7/8/10/11 Guide)
Method 1. Use System Configuration panel
This method relies on the System Configuration panel, and it boots into your chosen mode as long as you decide not to. It works for Windows 7, 8, 10, 11. This is also the easiest way to get Windows 10 into Safe Mode.
- To launch System Configuration panel, press Windows key + R, then in the Run prompt type msconfig, press Enter afterward.
- Go to the Boot tab and then look at Boot options. Put a tick on Safe boot and then choose the method you need.
- Minimal one simply boots into Safe mode;
- Alternate shell boots into mode with Command Prompt;
- Active Directory repair boots into a mode that allows repairing Active Directory server;
- Network boots into mode with Networking.
- After selecting the mode, click Apply and OK.
- You will be asked to restart the computer. Click Restart to confirm. The computer now boots into the mode you selected. Whenever you want to exit the safe mode and enter normal one, repeat steps 1-4, but make sure you uncheck the Safe Mode option in System Configuration > Boot tab.
Method 2. Access troubleshooting tools
If you are looking for a way to enter Safe Mode in Windows 11, 10 or 8, then you should review methods described below. First of all, choose a method to access troubleshooting tools – it depends whether you can start the operating system or not. The guide provided below covers both methods.
Step 1. Accessing the troubleshooting tools
In case your computer starts normally, try to boot in Safe Mode (Windows 8, 10 or 11) without F8.
- All you need to do is to turn your computer on and click on Restart while holding the Shift key. You can find Restart button in the login screen or the Windows menu (shown below).
- Another method to get into secure mode is via Windows Settings. Press Windows + I key at the same time; this opens the Settings app. Here, find an option called Update and Security, and click it. Now, navigate to Recovery tab. You will see Advanced Startup panel, click Restart Now under it.

Now, if your computer does not start properly at all, you should try one of the following methods.
In case you are having problems starting the operating system, try booting from a USB recovery drive. You can make one using another computer. You can also try the method with an F8 key, but it does not work in all cases – it depends on your computer model. Whichever way you get into the recovery mode, it will allow you to boot Windows in Safe Mode.
Step 2. Using the troubleshooting options
Methods described earlier will give you access to a special menu where you can choose from provided troubleshooting tools.
- In this menu, select Troubleshoot, then Advanced options.
- Here, select Startup Settings (or Windows Startup Settings). Finally, click the Restart button.
- Here, choose one from F1-F9 buttons, depending on what you want to do (in this case, F4, F5 or F6).
Do not get confused if after restart your computer displays a black screen with the same options – use arrow keys to select the right choice of Safe Mode, and just press Enter to continue.
Method 3. Force enter Automatic Repair mode in Windows 10
Interrupting normal Windows startup three times in a row triggers Automatic Repair mode. You can use this mode to start Windows 10 in Safe Mode while booting. To trigger the Automatic Repair one, you must interrupt normal Windows 10 startup three consecutive times. Follow the given guide attentively.
- To interrupt the startup, press Power or Reset button. In case you use Power button, you might need to keep it pressed for at least 4 seconds to force shut down. Then turn on the computer, force shut down again. You need to power on – force shutdown (interrupt the startup) three times in a row.
- You will understand that Windows is trying to access Automatic repair mode when it displays “Preparing Automatic Repair” on the screen.
- You may be asked to choose user account. Choose the one with admin’s rights, and enter the password for it.
- Wait until Windows loads. When asked whether you want to restart or enter Advanced options, choose the second option.
- Follow instructions given in Method 3.2.
In case you are using Windows 10 and you are having problems with blank device’s screen, we suggest checking suggestions provided in official Microsoft’s website.
This post was first published on October 28, 2018, and updated on October 16, 2022.

Norbert Webb is the head of Geek’s Advice team. He is the chief editor of the website who controls the quality of content published. The man also loves reading cybersecurity news, testing new software and sharing his insights on them. Norbert says that following his passion for information technology was one of the best decisions he has ever made. “I don’t feel like working while I’m doing something I love.” However, the geek has other interests, such as snowboarding and traveling.
Recent Posts
Geek Squad Email Scam Explained
Geek Squad Email Scam warns that a large sum will be deducted from the user's…
Remove ADLG Ransomware Virus (DECRYPT .adlg FILES)
ADLG Ransomware virus: What does it do to your files? ADLG ransomware virus is a…
Remove ADWW Ransomware Virus (DECRYPT .adww FILES)
ADWW ransomware virus encrypts files on a computer ADWW ransomware virus is the latest malware…
How to Right-Click on a Mac (7 Tested Methods)
Right-Clicking on Mac is Easy: Learn How to Do It Now Right-clicking on Mac computers…
Remove OFWW Ransomware Virus (DECRYPT .ofww FILES)
OFWW ransomware virus & how to protect your computer OFWW ransomware is a malicious computer…
Remove OFLG Ransomware Virus (DECRYPT .oflg FILES)
OFLG ransomware virus attacks computers globally OFLG ransomware virus is a dangerous computer malware that…
View Comments
Valuable Information.
What in situation, when my Laptop reports "No bootable device" after running Spyhunter 5 scan?
Dear MarkFr,
Try the system restore option or use a bootable device (f.e., USB) with Windows install on it.
However, are you sure Spyhunter caused it? Typically, running a scan doesn’t implement any system changes.