“Chrome Managed By Your Organization” Meaning
Contents
“Chrome Managed by Your Organization” is a message that appears in Google Chrome browser in case system policies control how it can be used. This notification usually appears in one of the following situations: either you are using a work, school, university or a public computer and the organization’s IT department has implemented specific policies for this web browser, or you have installed a spyware/malware variant that has hijacked Chrome settings.
Originally, Managed by Your Organization is known as a Google Chrome feature that indicates the network administrators have set browser usage policies for computers within organization.
However, regular home users can suddenly notice this warning as well. Naturally, it can seem slightly suspicious, especially when it restricts the user from changing certain browser’s settings on one’s own computer. In certain situations, this message appears in case the Windows or Mac computer is infected with a severe browser hijacker. In this article, we’ll get into the meaning of the warning and ways to remove Chrome Managed by Your Organization feature.

What is Chrome management feature?
We’ll start with explanation what Chrome Management feature was made for. The reason is that it allows network administrators to control browser settings in company computers. For instance, if your workplace, school or university provides PCs or laptops, the administrator can configure numerous policies to control how Chrome works, what you can/cannot do with it, what homepage will be set as default and similar functionalities.
For example, your organization’s administrator might put a restriction on sites like Facebook, Twitter, various torrent-sharing sites, adult-only and gambling websites so that users within that organization wouldn’t be able to access these sites no matter the circumstances. Once set, these settings cannot be changed by regular user. Most of the time, these restrictions are made for the user’s and organizations’ security as well as to create a more productive work environment.
What if you’re using your own computer?
If your computer does not belong to specific organization or group, and you’re using a personal computer, you might still encounter this notification. Due to changes in Chrome 73, programs on your computer system which set enterprise policies can control how your browser works. In most cases, the message is caused by legitimate programs and there’s nothing to worry about.
Beware of potentially unwanted programs that change Chrome policies
Aside from organizations and groups, or legitimate programs, Your Browser is Managed by Your Organization message can signal about spyware/malware infection on your computer. There are a number of well-known browser hijackers that are capable of setting Chrome policies all of a sudden. Some of such examples are OptimumSearch, Mazy Search and Comet Search. If you notice suspicious browser extensions appearing in your browser or any other activity that doesn’t seem initiated by you, such as browser redirects, excessive amount of pop-up ads or push notifications, you should check your computer’s security situation immediately.
One of the suspicious activities you might observe is unexpected chain of redirects when using web search via browser’s URL bar or default homepage. Such hits to specific websites, often unnoticed by the user, help generate revenue for the spyware developers.
In addition, potentially unwanted programs like adware or browser hijackers use various tracking technologies to observe information such as user’s browsing activity, search queries, visited websites, IP addresses, geolocation data or even details about software installed on the computer. In worse scenarios, these unwanted programs might pick up even personally identifiable information.
Collected data can be used to deliver targeted advertisements, or can be sold to third-parties. When dealing with such programs, we recommend being on the safe side and removing them as soon as possible.
If you suspect that your computer was infected with spyware/malware that might be causing this Chrome managed By Your Organization to appear all of sudden, you should definitely dive deeper into the issue and explore possible causes for it.
You can also confirm if your browser is managed by entering chrome://management in your browser’s URL bar and hitting Enter. If you see the discussed notification here, it means that some settings are controlled by a third-party app or your organization. If it is a specific application, you will see its name here. Most likely you will need to remove so-called “Your browser is managed by your organization” virus from your browser and/or your computer system to get rid of unwanted restrictions.
You can see an example below of a Chrome browser that’s not managed by a company or organization and one that’s affected by OptimumSearch browser hijacker.

To remove Chrome Managed by Your Organization from Windows 10/11 or Mac and make your browsing sessions secure, use a trustworthy malware removal software. You can use antivirus software of your choice. If you are unsure which program to install, consider trusting our team’s favourite – INTEGO Antivirus. On top of that, download RESTORO to identify privacy, security and PC stability issues on your computer.
Threat Summary
| Name | Managed by Your Organization (Chrome) |
| Type | Browser hijacker; adware; potentially unwanted program; browser policies controller |
| Target browsers | Chrome, Firefox, Edge and others |
| Symptoms | Browser displays “Managed by your organization” notification in settings. The user might notice that certain browser’s functions are unavailable or cannot be changed due to this setting. In addition, browser redirects, unexpected search engine or homepage changes might appear. |
| Distribution | This setting can be set either by organizations/groups, or initiated by potentially unwanted programs unknowingly installed by the computer user. |
| Remove on Mac | Clean persistent spyware/malware threats on Mac computers using INTEGO. |
| Removal | Remove computer infections using strong and trustworthy malware removal program such as INTEGO Antivirus for Windows. To repair virus damage on Windows OS, consider scanning with RESTORO |
REPAIR VIRUS DAMAGE
Scan your system for FREE to detect security, hardware and stability issues. You can use the scan results and try to remove threats manually, or you can choose to get the full version of software to fix detected issues and repair virus damage to Windows OS system files automatically. Includes Avira spyware/malware detection & removal engine.
How to avoid installing potentially unwanted programs
Most of the time, computer users install potentially unwanted, dangerous, or even malicious software unknowingly and unwillingly. No one wants to install junkware on their computers, especially when it threatens their security and privacy. Sadly, the way that these programs are distributed is tricky, and often designed to sneak into the system unnoticed, yet with user’s approval.
This technique is called software bundling. Say, you wanted to download a game or a software downloading tool, so you hop into the first webpage that comes in search results and download it from there. The installer says you can choose Custom/Advanced installation or Recommended one. Nobody likes to meddle with tricky settings, so users often opt for the Recommended installation. This, unfortunately, doesn’t reveal all of the installer’s trickeries and suggestions to install recommended third-party software promoted by the installer. As a result, the user installs not only his chosen program, but one or a bunch of potentially unwanted programs on the computer.
To avoid installing unwanted programs, we suggest choosing Advanced or Custom installation options, and reading given suggestions carefully. If you come across offers to add additional tools such as browser toolbars, new tab search, or other useless pieces of software, opt them out by removing the checkmark next to them.
Another way of installing such unneeded programs is by clicking on fake pop-up ads online; these often come up on expired domains re-purchased by scammers. These sites falsely claim that you need an Adobe Flash Player update, or Java update. Unfortunately, instead of updating anything, you will install unwanted software on your computer.
And finally, stay away from illegal downloads, such as software cracking tools. Installing these can heavily infect your computer with malware, such as persistent hijackers, miners, Trojans or even ransomware. If you want a legitimate and safe copy of software, head to the software vendor’s website and get it from there. Many programs offer trial versions that are completely free.
How to remove Managed By Your Organization from Chrome (Windows)
The following instructions will explain how to remove Managed by Your Organization from Chrome, and provide further details on eliminating spyware from your computer.
Follow these guidelines to ensure secure Managed by Your Organization removal. If you do not want to meddle with computer’s and browser’s settings yourself, you can use an antivirus software for it. Our team strongly recommends using INTEGO Antivirus for this matter.
Manual Managed By Your Organization removal from Chrome:
The first thing you need to do is reset Chrome browser. To do this, simply close the browser and, if needed, end its processes via Task Manager. Once it is completely closed, do the following:
- Go to C:\Users\[your PC account name]\AppData\Local and delete Google folder.

- Delete the following registry keys:
Computer\HKEY_LOCAL_MACHINE\SOFTWARE\Policies\Chromium Computer\HKEY_LOCAL_MACHINE\SOFTWARE\Policies\Google\Chrome
Note. Delete only the “Chrome” key, not the “Google” folder itself.
- Now, you will need to delete group policy folders from the computer. Go to C:\Windows\System32. Here, delete GroupPolicy and GroupPolicyUsers folders. If required, provide administrator’s permission and password.

- Use Windows search to find Command Prompt and right-click the matching result. Choose Run as Administrator.
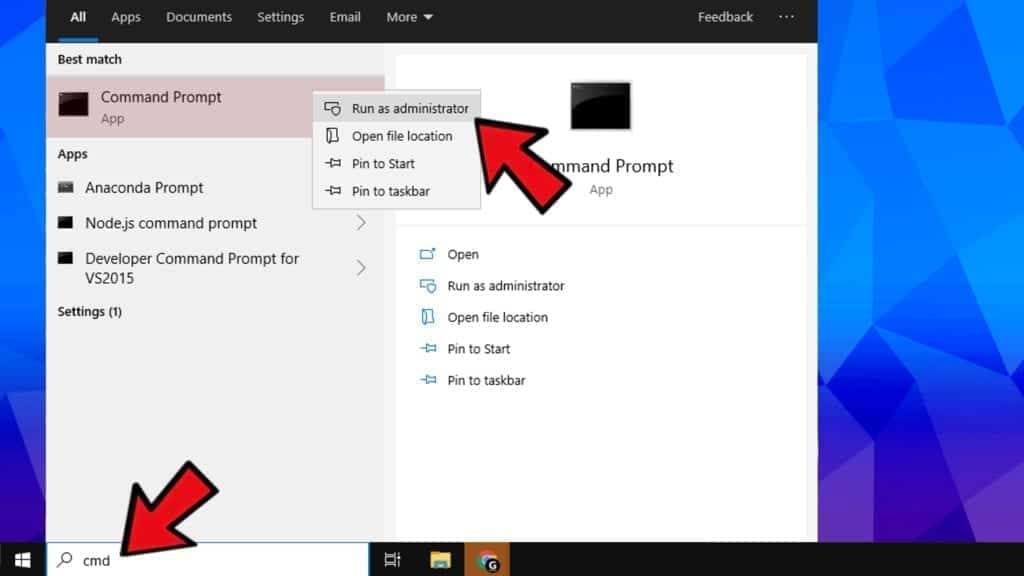
- Type gpupdate /force and press Enter.

How to remove Managed By Your Organization from Chrome and Safari on Mac
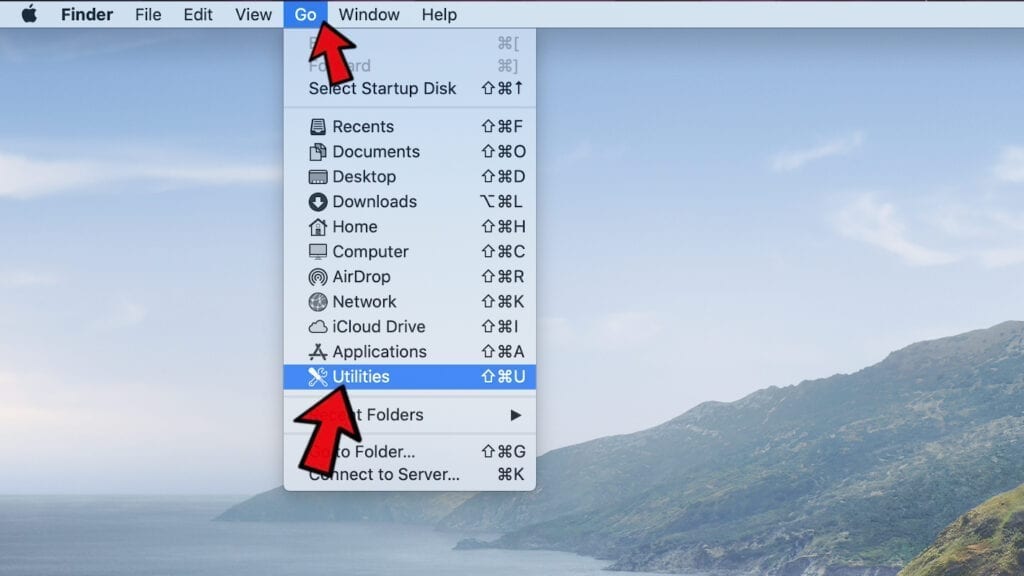
The instructions provided below will explain how to remove Managed by your organization notification from Chrome and Safari on Mac. This mostly happens due to additional Profiles added to your Mac’s System Settings, so you will need to delete them.
- First, click on Go in Apple menu and click on Utilities.
- Now, double-click on Activity Monitor.
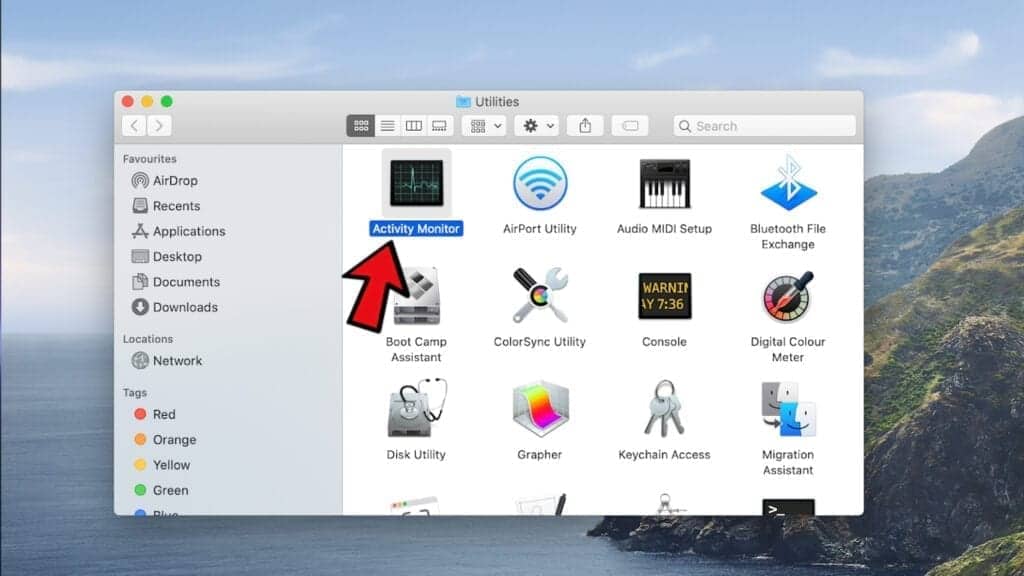
- In Activity Monitor, check for unfamiliar or suspicious processes. If you’re undecided whether the process is harmful or is simply part of legitimate processes, you can look up its name online. If you have located a harmful/unwanted process, select it and click Stop button at the top of the window.

- You will see a pop-up asking whether you are sure you want to quit the process. Choose Force Quit option.

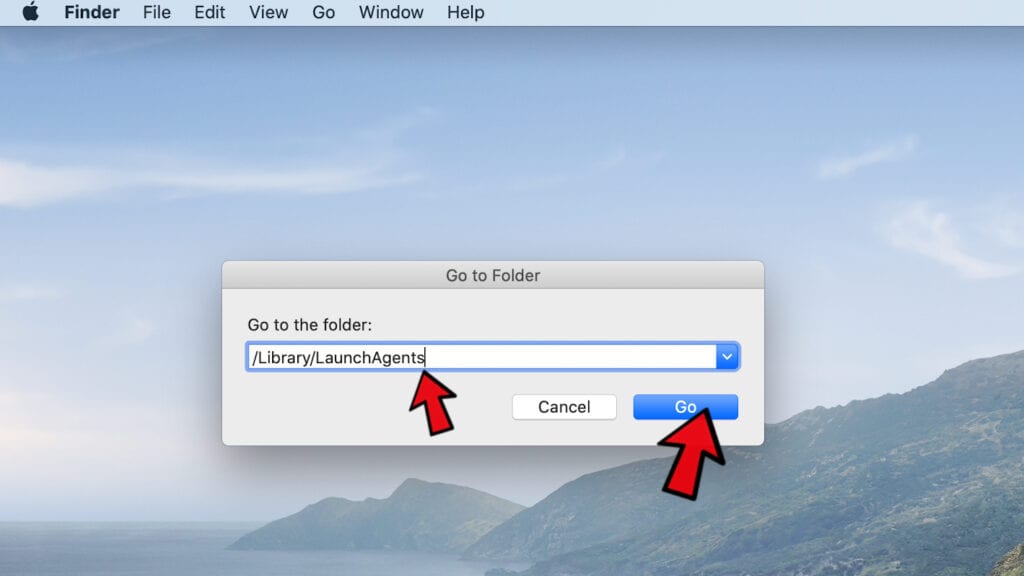
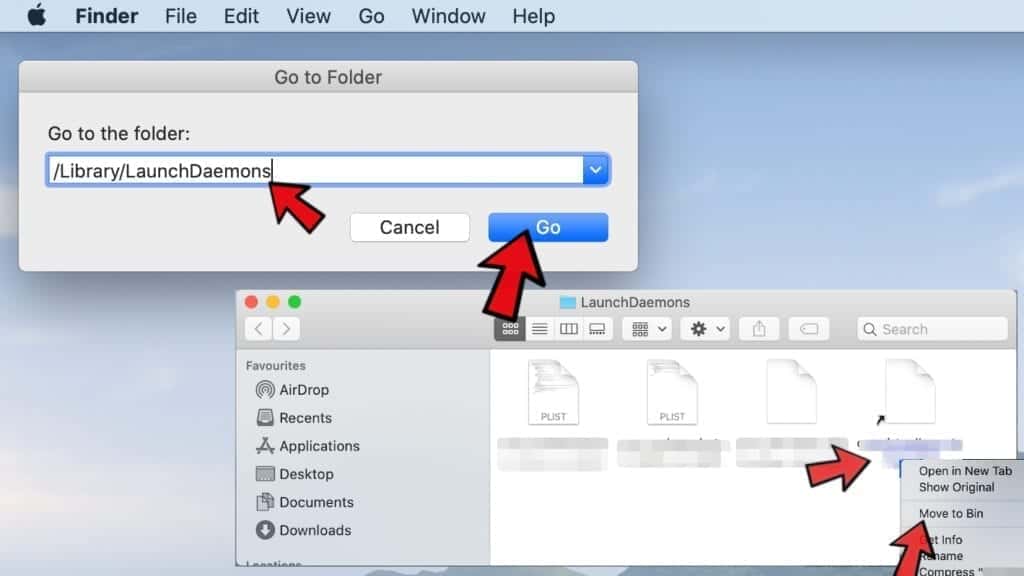
- Now, click on Go in Apple menu and choose Go to Folder.
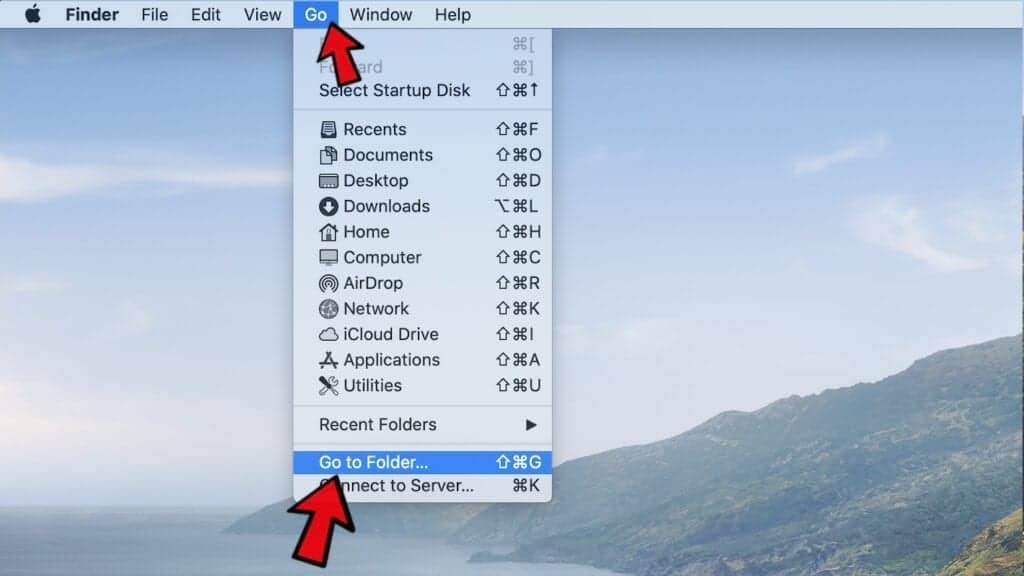
- In the window that appears on screen, type /Library/LaunchAgents and press Go.
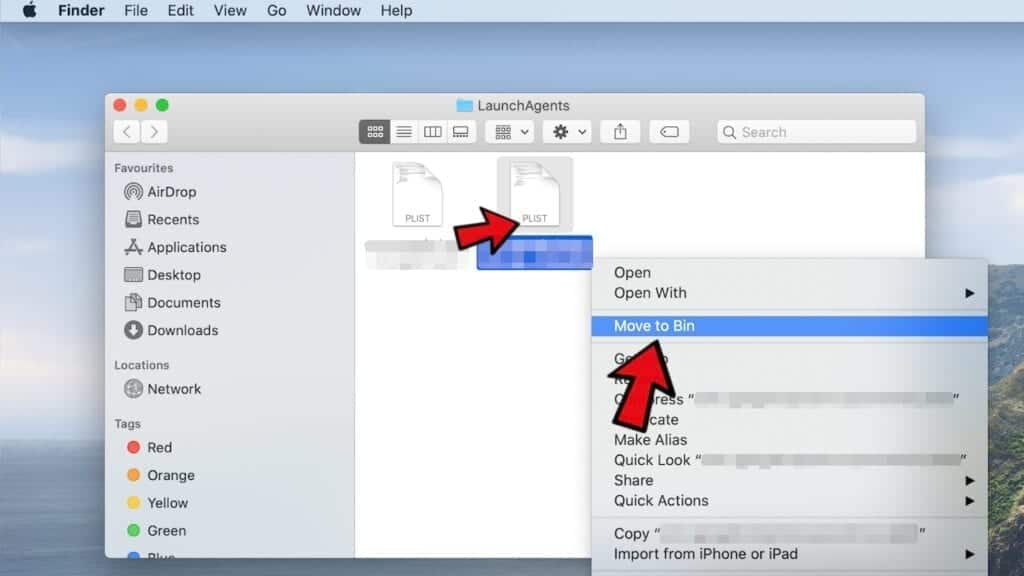
- Look through the files in this folder and try to locate unwanted files possibly belonging to potentially unwanted programs. When in doubt, you can try to look up suspicious-looking names online as well. However, some of most widespread Mac infections usually drop these files: com.pcv.hlpramc.plist, com.SearchRange.plist, com.updater.mcy.plist, com.PrimaryServiceSearch.plist, com.avickUpd.plist, com.SearchLibrary, com.msp.agent.plist and similar. After locating unwanted .plist files, drag them to Bin.

- Again, click on Go in Apple menu and choose Go to Folder, then type the following location: ~/Library/Application Support and press Go. Do not forget to type the tilde (~) character!
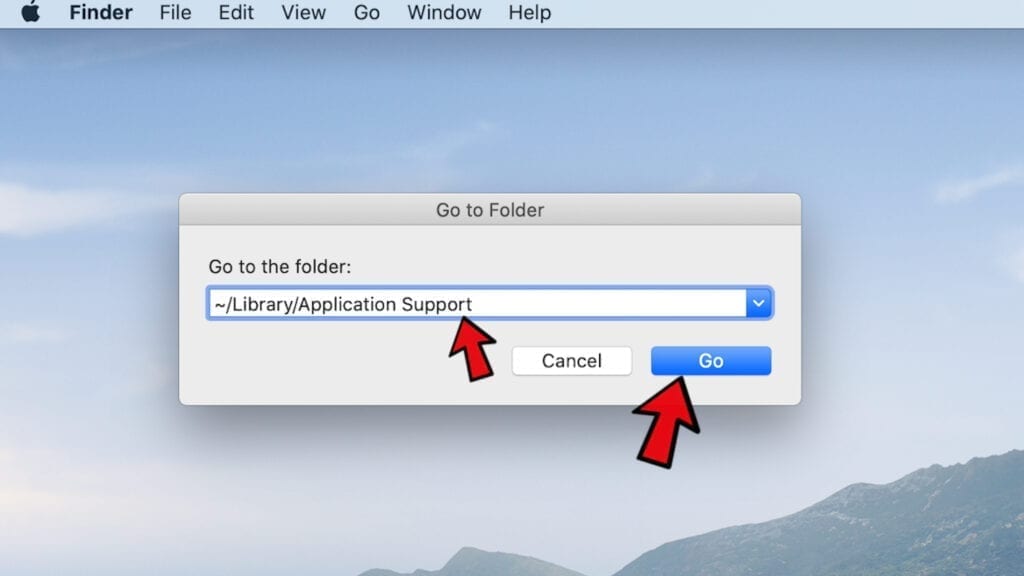
- In Application Support, carefully inspect folders and try to locate ones possible related to the app that’s controlling your Chrome and Safari settings. Select these folders and drag them to Bin.
TIP: Some of the well-known malicious/unwanted programs will create folders named ProgessSite, IdeaShared, ExtraBrowser, com.PrimaryServiceSearch/PrimaryServiceSearch, com.PrimaryServiceSearchDaemon/PrimaryServiceSearch, com.SearchRange/SearchRange, com.SearchLibrary, com.SearchLibraryDaemon, com.ExpertModuleSearch, com.ExpertModuleSearchDaemon, com.GlobalAdviseSearchDaemon/GlobalAdviseSearch.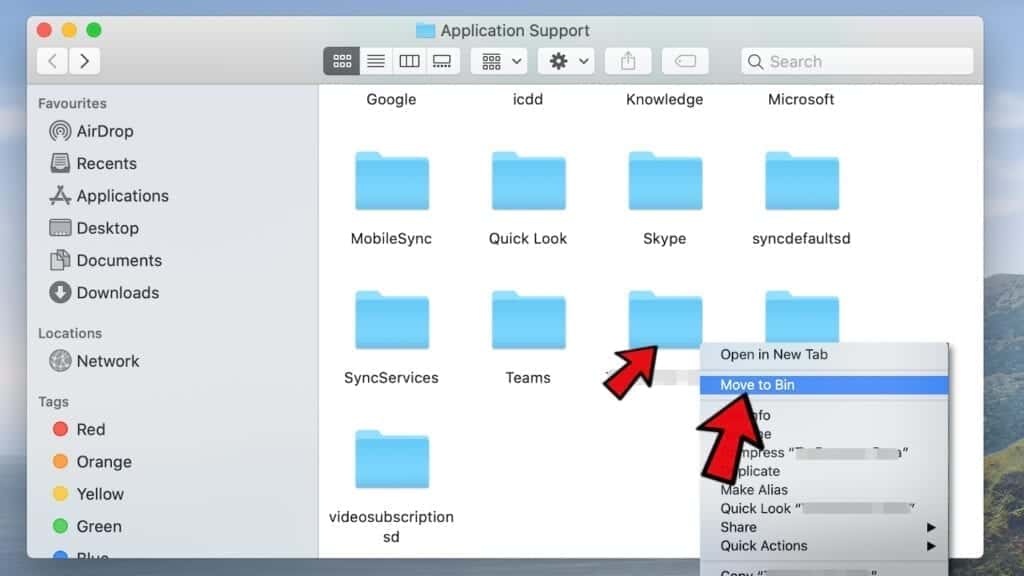
- Next, click on Go in Apple menu and choose Go to Folder, then type the following location: ~/Library/LaunchAgents and press Go. Do not forget to type the tilde (~) character!
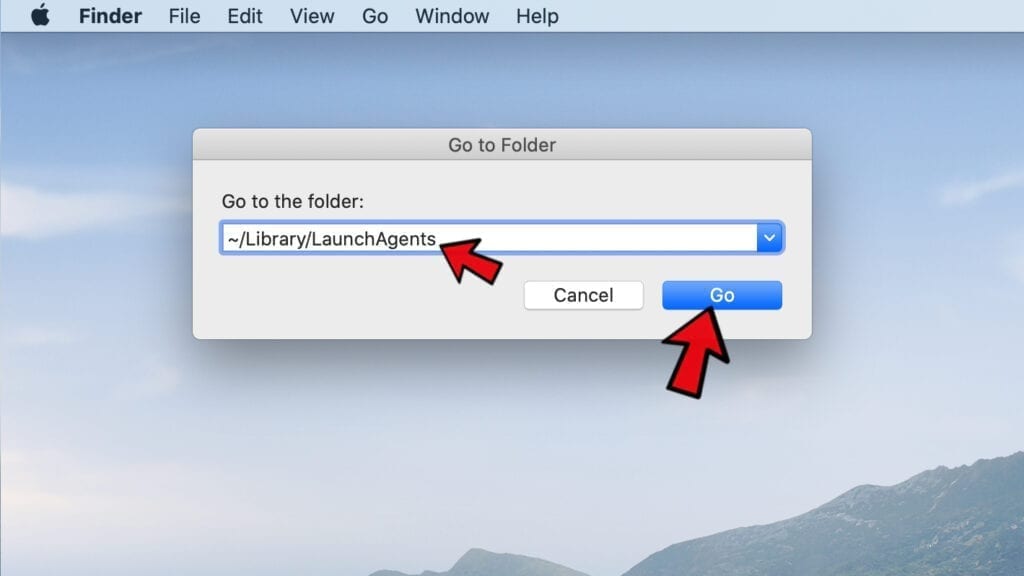
- In LaunchAgents folder, look for suspicious entries again. Drag suspicious entries to Bin. Some of well-known files associated with potentially unwanted programs on Mac may be called com.PrimaryServiceSearch.plist, com.SearchLibrary.plist, com.ExpertModuleSearch.plist, com.GlobalAdviseSearch.plist.
- The Final folder that you need to inspect is ~/Library/LaunchDaemons – so type this location via Go to Folder function again and press Go. Delete suspicious entries from this folder as well. You may want to delete entries like com.pplauncher.plist, com.GlobalAdviseSearchDaemon.plist, com.startup.plist, com.ExpertModuleSearchDaemon.plist, com.PrimaryServiceSearchDaemon.plist.
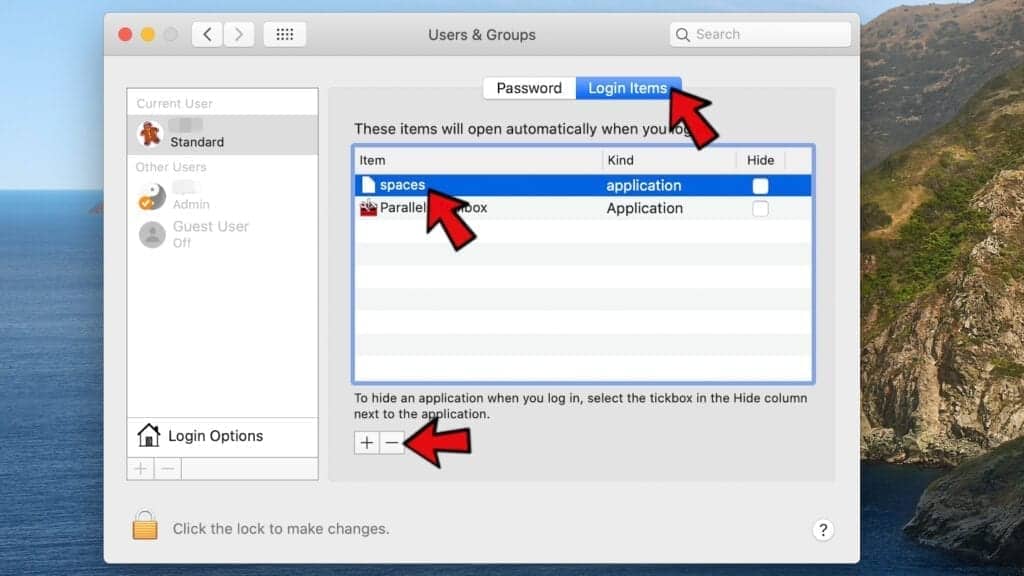
- Now, click on Apple logo in the upper menu and select System Settings.

- In System Settings, go to Users & Groups, then go to Login Items tab. Here, you will find a list of items that are set to launch automatically after the computer startup. Select unwanted programs and click the minus button.
-
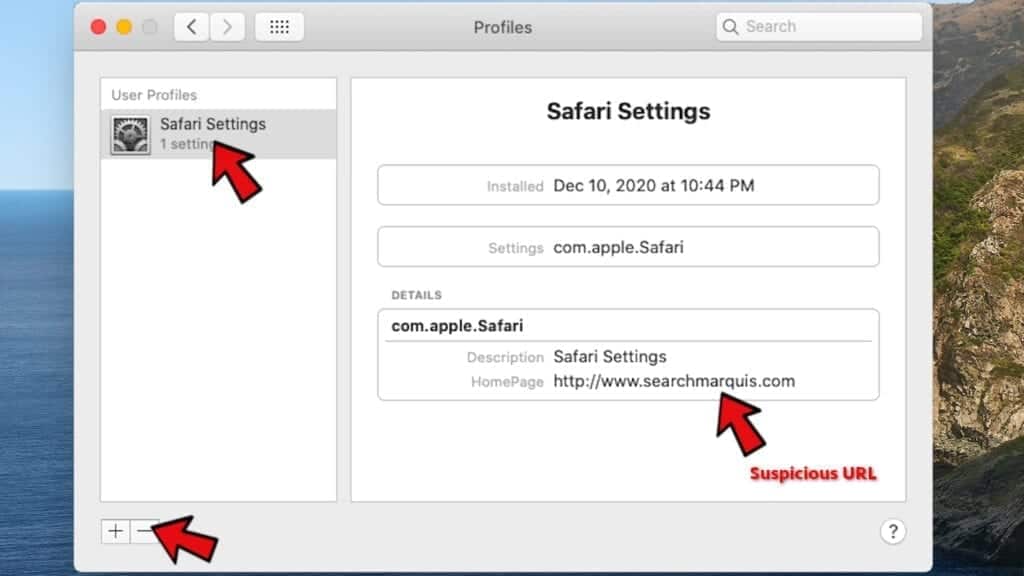
Go back to System Settings and click on Profiles. If you can’t find it here, most likely it means you’re using a newer OS version. Then you need to select Privacy & Security from the left pane, then scroll down on the right pane and click on Profiles.

- Here, look for suspicious profiles that were added by malicious/unwanted programs. Select them and click the minus button. You can usually identify them as they have suspicious URL set as homepage.
Now, once you complete the steps above, follow the traditional spyware/malware removal instructions to finish Managed By Your Organization removal. You can find instructions for both Windows and Mac users below.
OUR GEEKS RECOMMEND
Our team recommends removing malware using a professional antivirus software.
REMOVE THREATS WITH ROBUST ANTIVIRUS

Get INTEGO ANTIVIRUS for Windows to remove ransomware, Trojans, adware and other spyware and malware variants and protect your PC and network drives 24/7. This VB100-certified security software uses state-of-art technology to provide protection against ransomware, Zero-Day attacks and advanced threats, Intego Web Shield blocks dangerous websites, phishing attacks, malicious downloads and installation of potentially unwanted programs.
Use INTEGO Antivirus to remove detected threats from your computer.
GeeksAdvice.com editors select recommended products based on their effectiveness. We may earn a commission from affiliate links, at no additional cost to you. Learn more.
Managed By Your Organization related programs Removal Tutorial
To remove the unwanted program from your computer, use these instructions below to uninstall associated programs or apps from your Windows or Mac computer. Then scroll down for instructions how to clean each affected web browser individually.
Remove Managed By Your Organization related programs from Windows
Windows 10/8.1/8 users
Click on the Windows logo to open Windows menu. In search, type control panel and select the matching result. Then go to Programs and Features.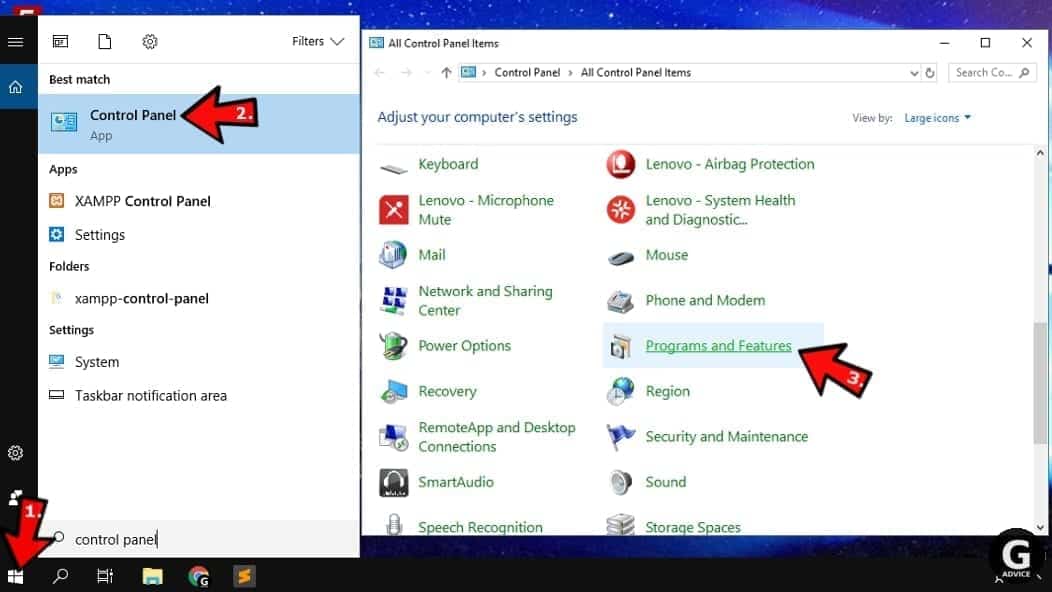
Windows 7 users
First, open Windows menu by clicking on the icon in the lower left corner of the screen. Then go to Control Panel and find section called Programs. Click on the Uninstall a program option under it.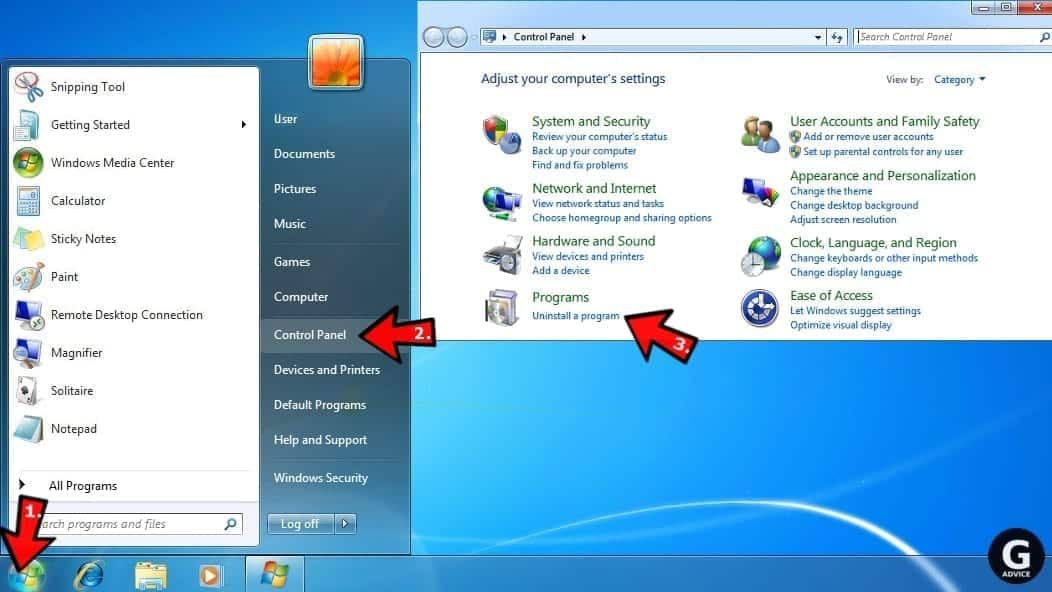
Windows XP users
In Windows XP, click Start > Control Panel > Add or Remove Programs.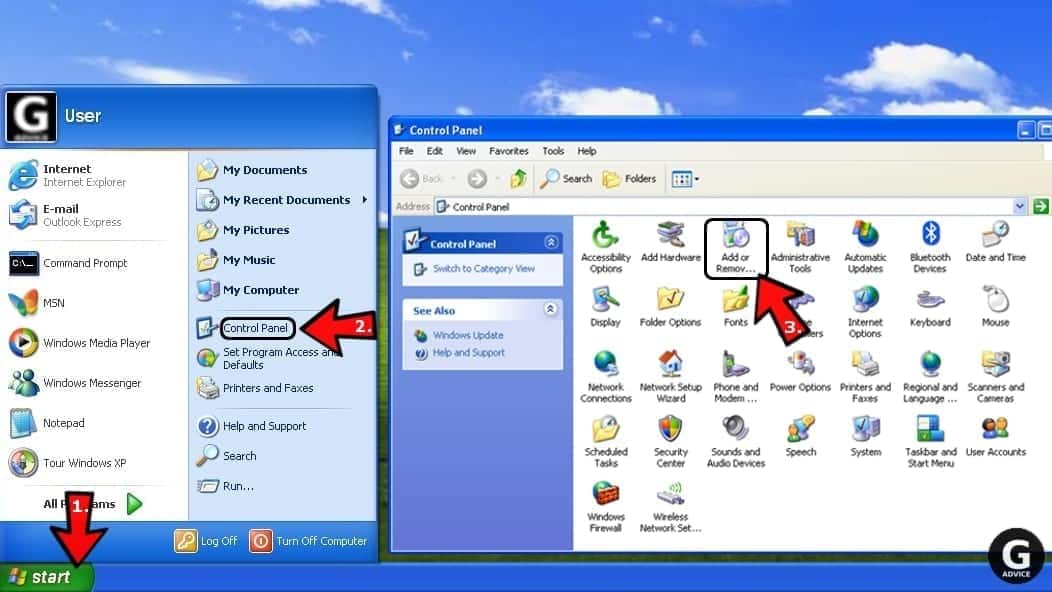
Uninstall unwanted programs
Once in Programs and Features, look through the list of installed programs. You can click on Installed on tab to sort the programs by their installation date.
Right-click on suspicious programs you can't remember installing and choose Uninstall. Follow instructions provided by the Uninstall Wizard, click Next and finally Finish to uninstall the unwanted program from your PC.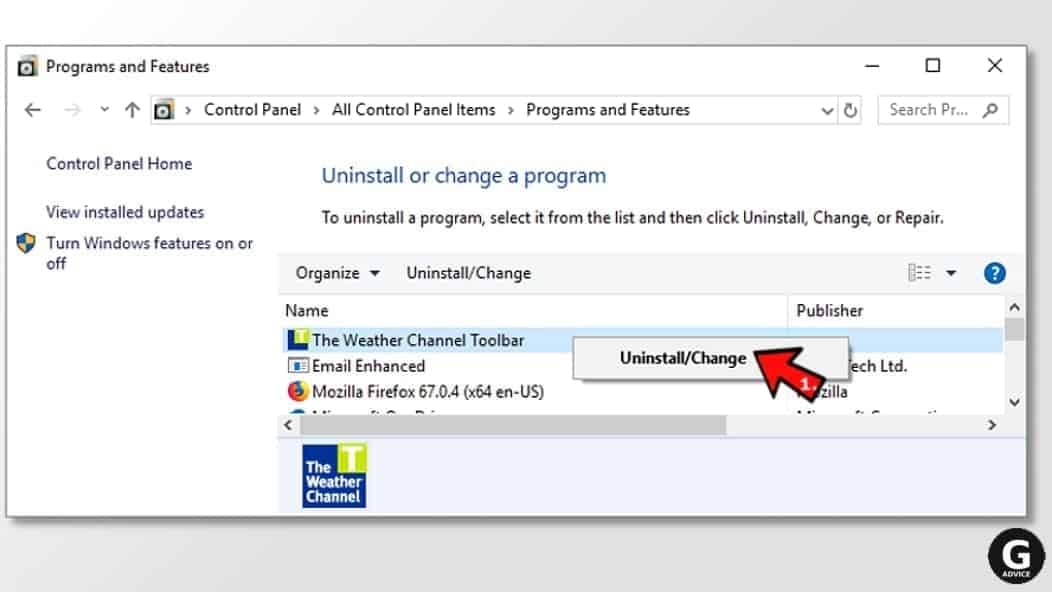
Remove Managed By Your Organization related programs from Mac
- Click on Finder.
- Go to Applications folder.
- Look for suspicious applications you can't remember installing. Right-click them and select Move to Trash.
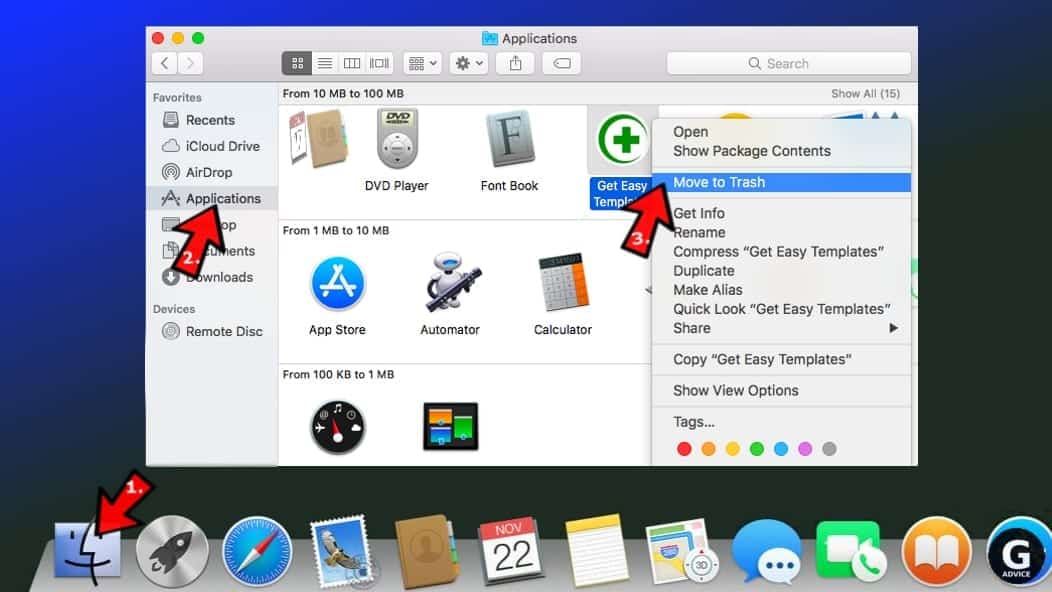
- After moving all suspicious apps to Trash, right-click the Trash bin in Mac's Dock and select Empty Trash.
Remove using INTEGO ANTIVIRUS for Mac (includes scanning for iOS devices). The one-of-a-kind security suite provides VirusBarrier X9 real-time protection against Mac and Windows-based malware, removes existing threats and scans for malware in popular e-mail clients. Includes NetBarrier X9, an intelligent firewall for home, work and public connections.
Remove Managed By Your Organization related programs from Google Chrome
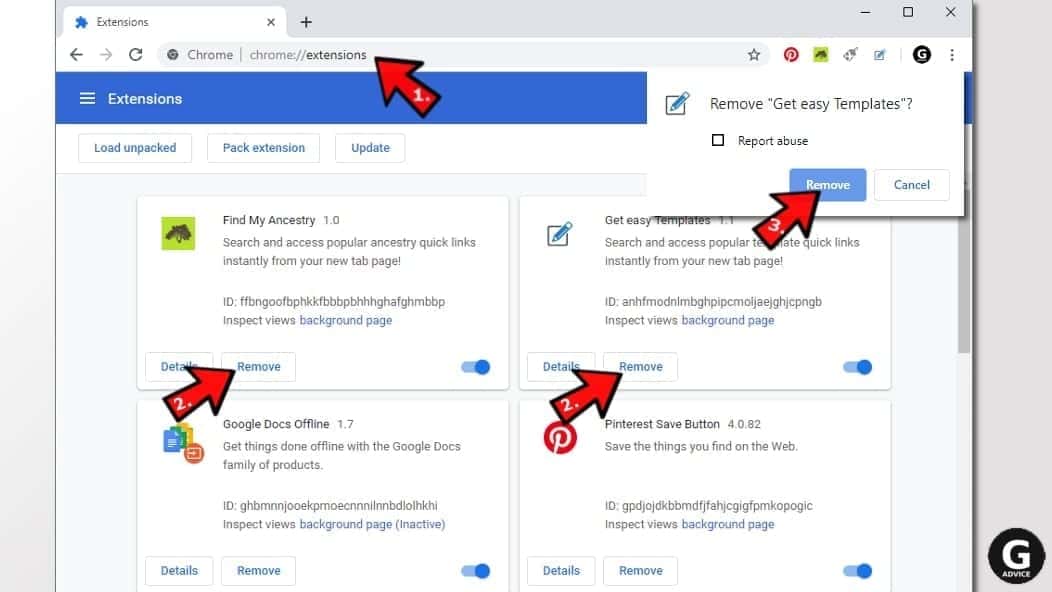
Remove suspicious Chrome extensions
- Open Chrome and type chrome://extensions into address bar and press Enter.
- Here, look for suspicious extensions, and Remove them.
- Don't forget to confirm by pressing Remove in the confirmation pop-up.
Change Start Page settings
- In Chrome address bar, type chrome://settings and press Enter.
- Scroll down to the On startup section. Check for suspicious extensions controlling these settings, and Disable them.
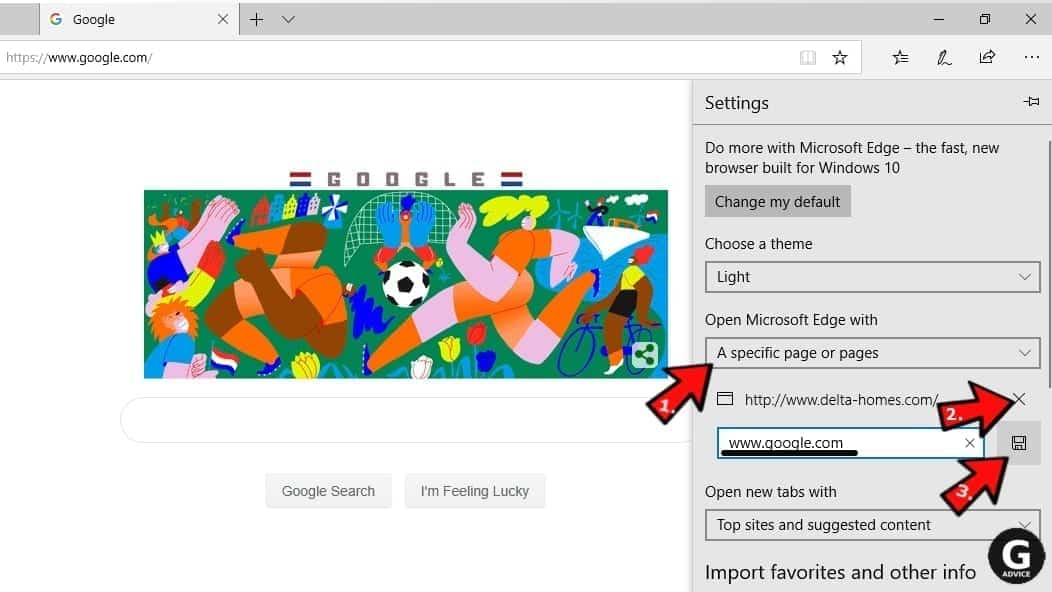
- Additionally, you can set browser to Open a specific page or set of pages via these settings. Simply choose this option, click Add a new page, enter your preferred URL (f.e. www.google.com) and press Add.

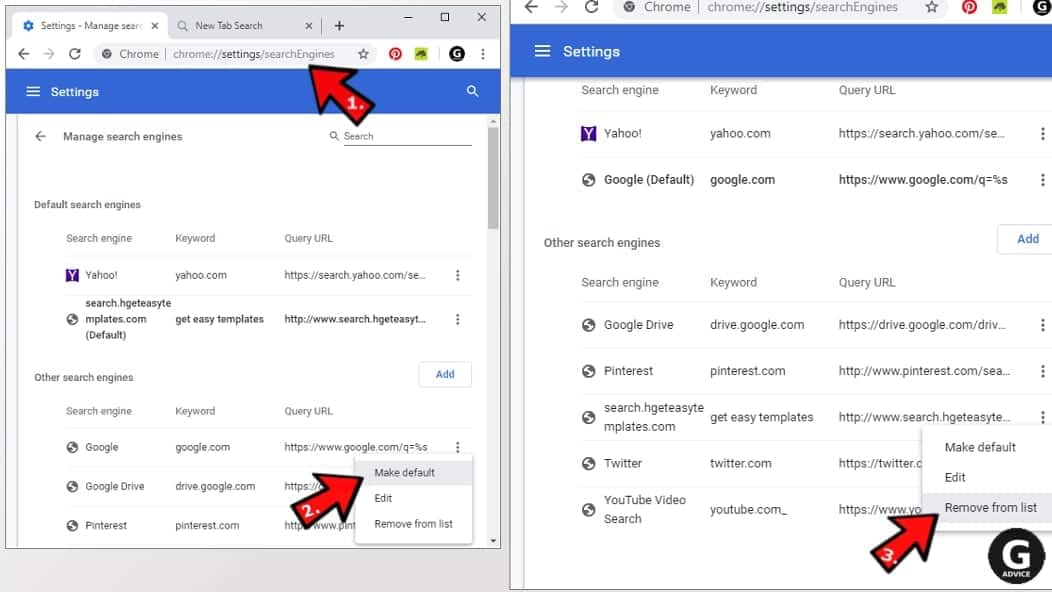
Change default search settings
- In Chrome URL bar, type chrome://settings/searchEngines and press Enter. Make sure you type searchEngines, not searchengines. Additionally, you can go to chrome://settings and find Manage search engines option.
- First, look at the list of search engines and find the one you want to set as default. Click the three dots next to it and select Make Default.
- Finally, look through the list and eliminate suspicious entries. Right-click the three dots and select Remove from the list.
Remove push notifications from Chrome
If you want to get rid of the annoying ads and so-called push-notifications viruses, you must identify their components and clean your browser. You can easily remove ads from Chrome by following these steps:
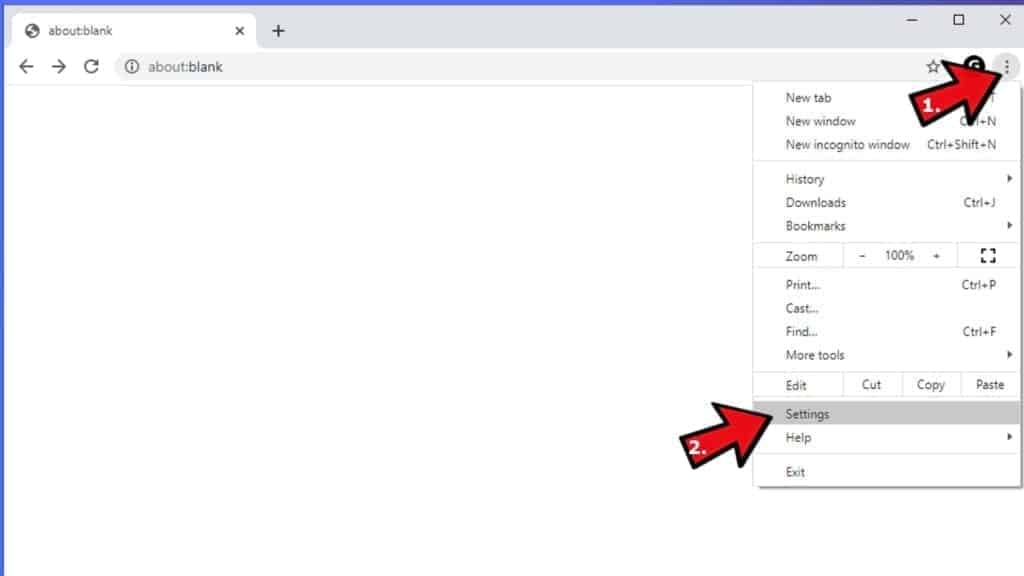
- In Google Chrome, press on Menu (upward arrow) in the top-right corner of the window.
- Select Settings.
- Go to Privacy and Security > Site Settings.
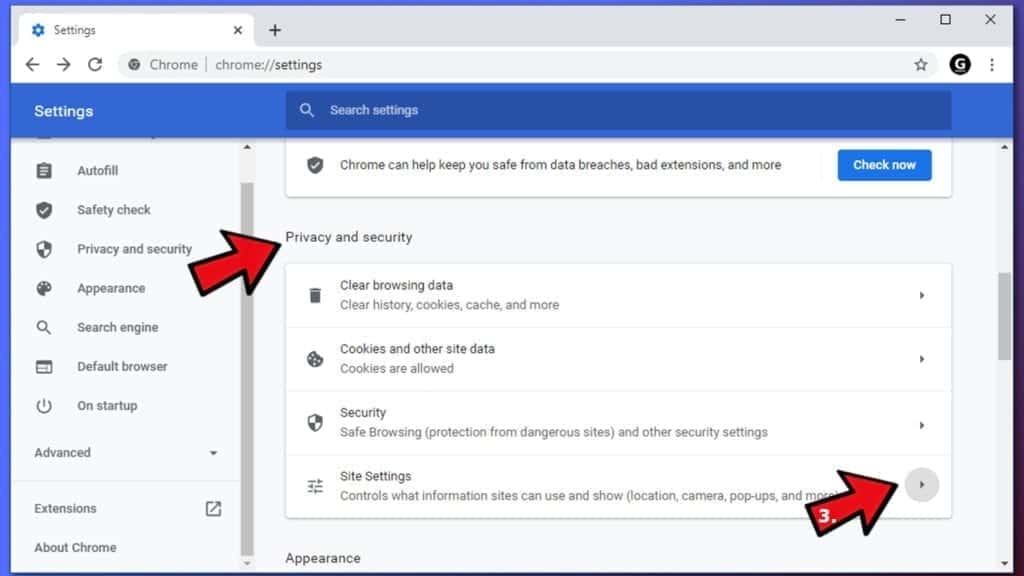
- Open Notifications.
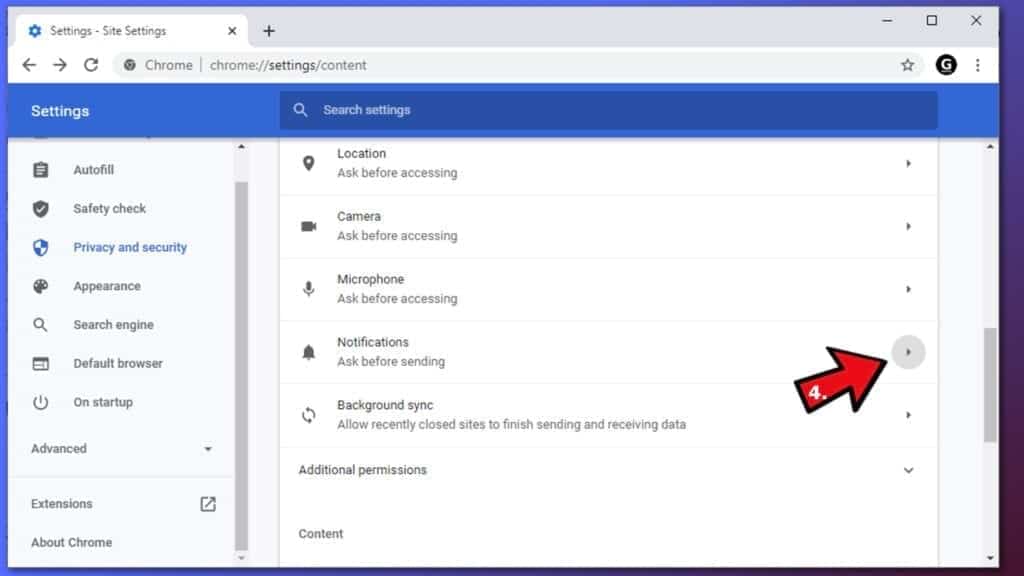
- Here, go to the Allow list and identify suspicious URLs. You can either Block or Remove by pressing on the three vertical dots on the right side of the URL. However, we suggest the Block option, so the site won't ask you to enable the notifications if you ever visit it again.

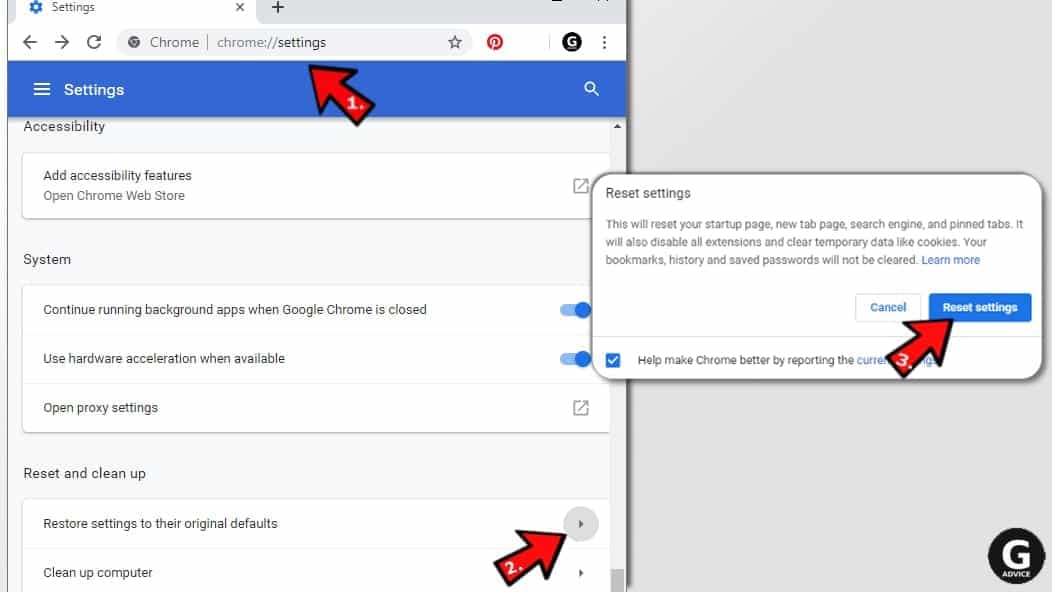
Reset Google Chrome browser
- The final option is to reset Google Chrome. Type chrome://settings in the URL bar, press Enter and then scroll down until you see Advanced option. Click it and scroll to the bottom of the settings.
- Click Restore settings to their original defaults.
- Click Restore settings to confirm.
Remove Managed By Your Organization related programs from Mozilla Firefox
Remove unwanted add-ons from Firefox
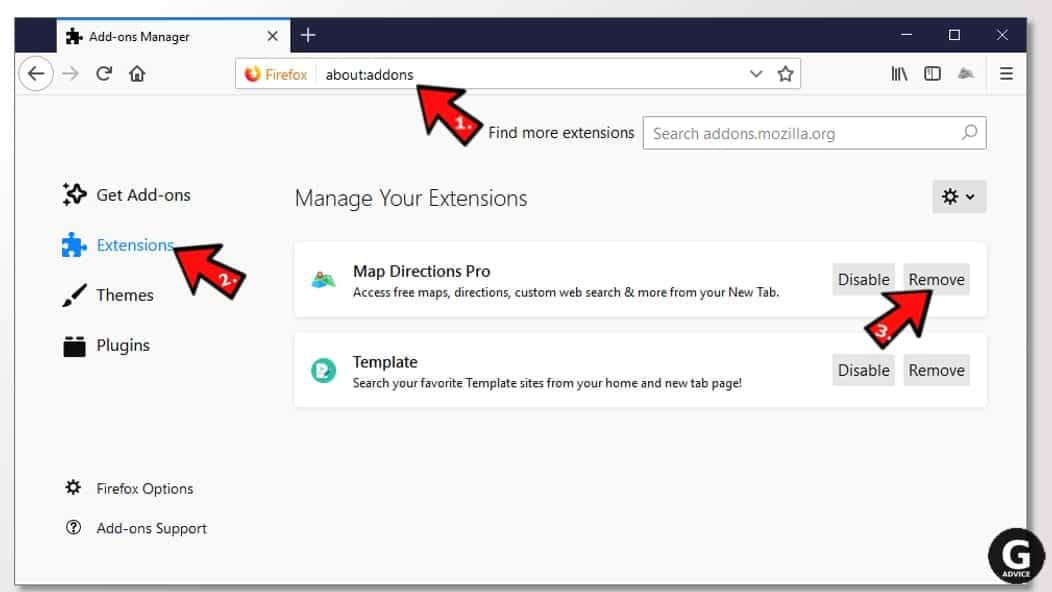
- Open Firefox and type about:addons in the URL bar. Press Enter.
- Now, click on Extensions (in the left section).
- Click Remove next to every suspicious browser add-on that you can't remember installing.
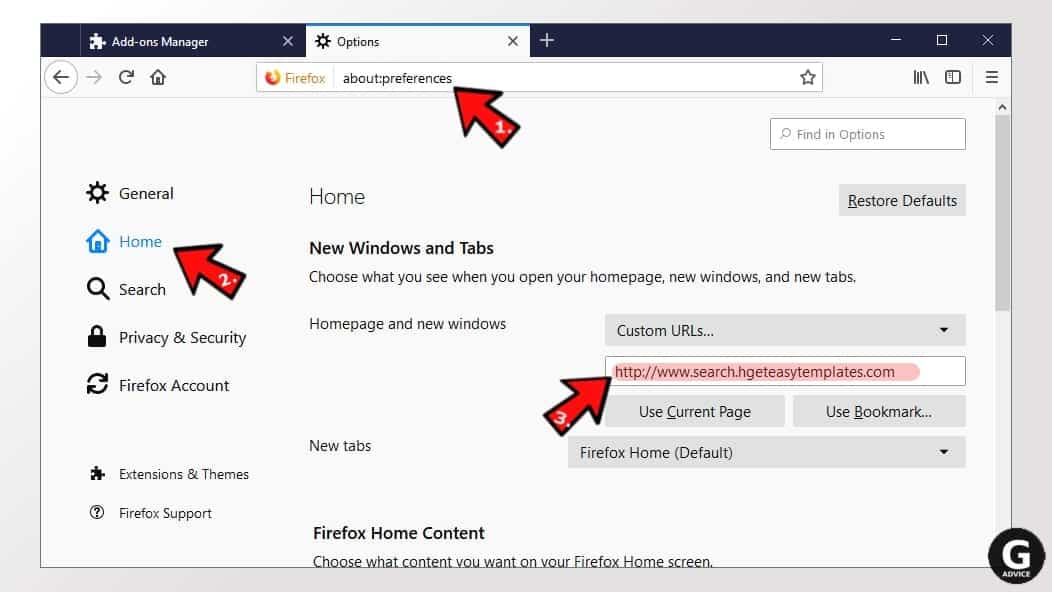
Change Firefox Homepage
- In Firefox address bar, type about:preferences and hit Enter.
- Look at the left and click the Home tab.
- Here, delete the suspicious URL and type or paste in the URL of a website you'd like to set as your homepage.
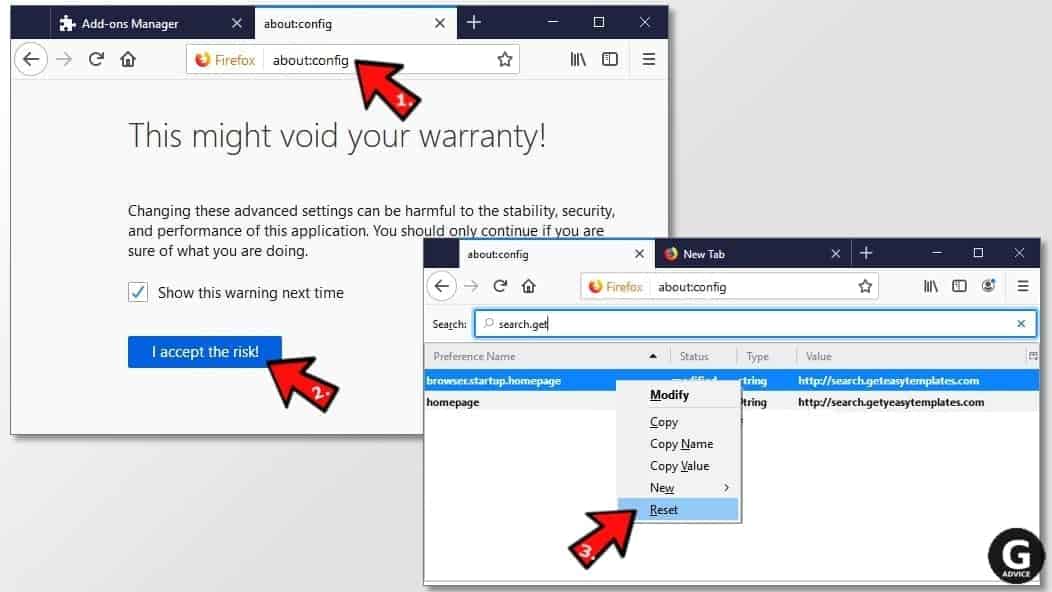
Alter preferences in Firefox
- Type about:config in Firefox address bar and hit Enter.
- Click I accept the risk! to continue.
- Here, type in the URL which has taken over your browser without your knowledge. Right-click each value that includes it and choose Reset.
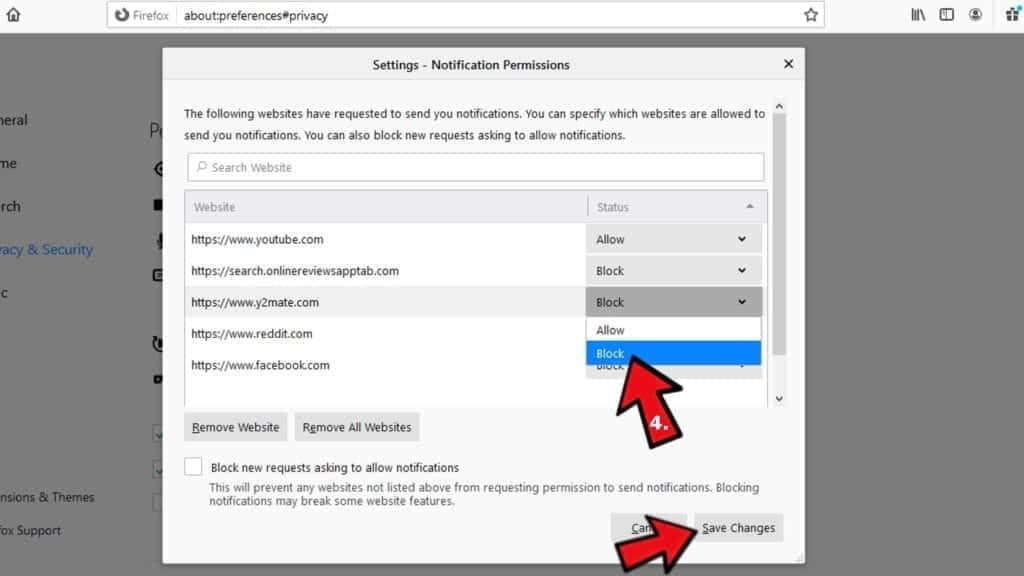
Remove annoying push notifications from Firefox
Suspicious sites that ask to enable push notifications gain access to Mozilla's settings and can deliver intrusive advertisements when browsing the Internet. Therefore, you should remove access to your browser by following these simple steps:
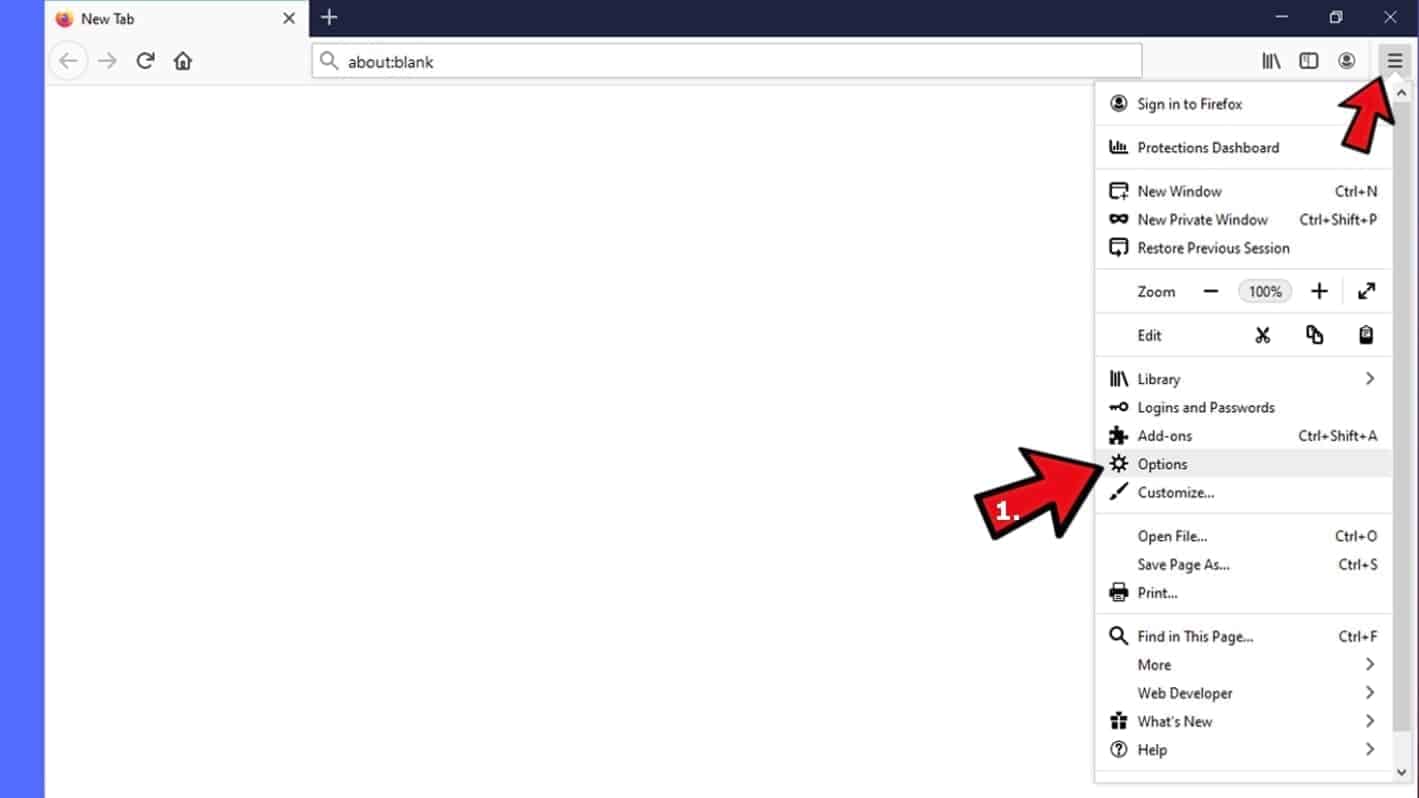
- In Mozilla Firefox, click on Menu (the three horizontal bars) on the top-right corner of the window, then choose Options.
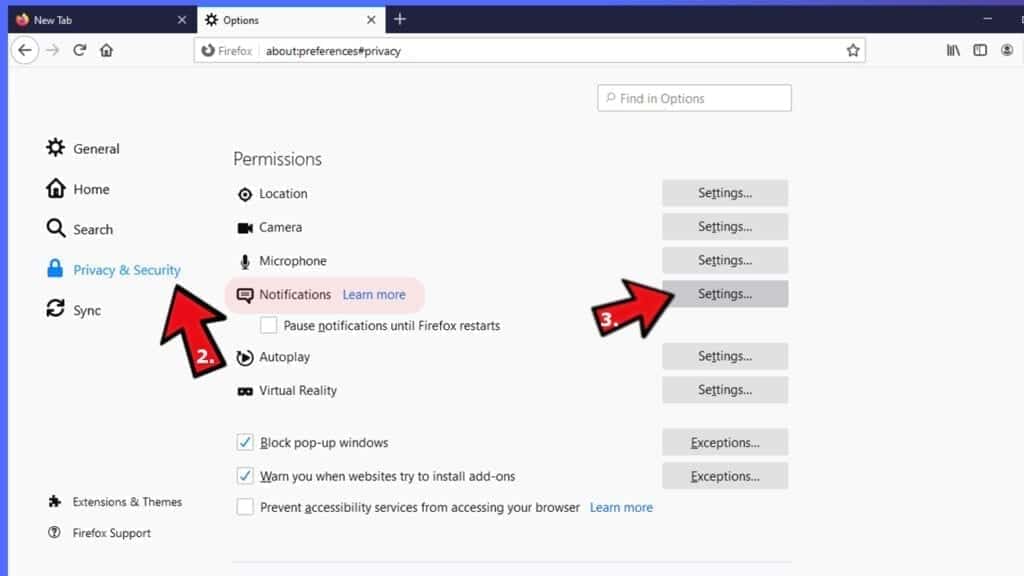
- Click on Privacy and Security, then scroll down to Permissions section.
- Here, find Notifications and click Settings button next to it.
- Identify all unknown URLs and choose to Block them. Click Save Changes afterward.
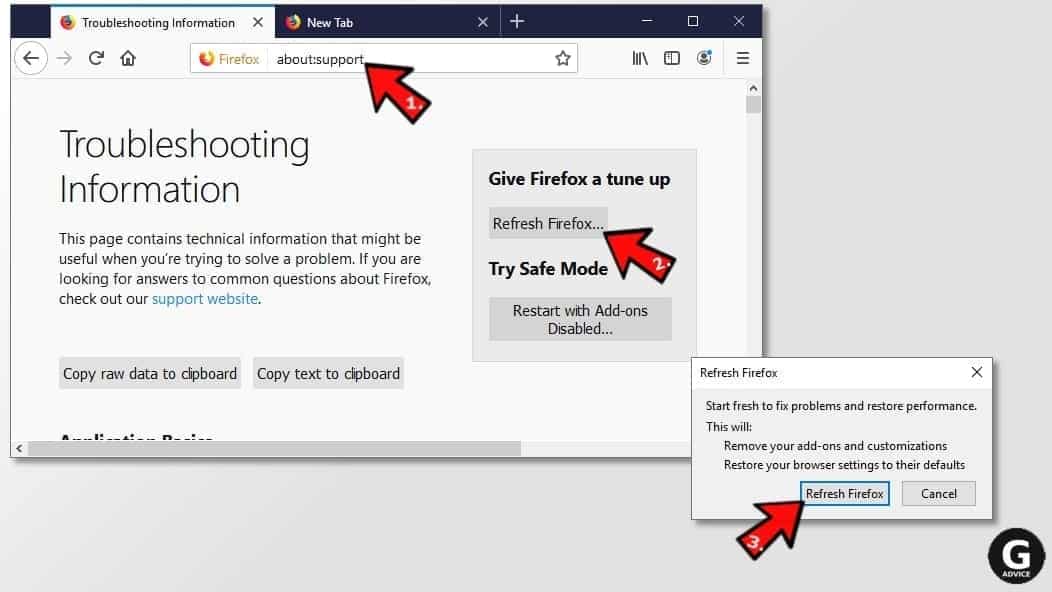
Reset Mozilla Firefox
- In Firefox, type about:support in the address bar and press Enter.
- Click on Refresh Firefox...
- Click Refresh Firefox again to confirm.
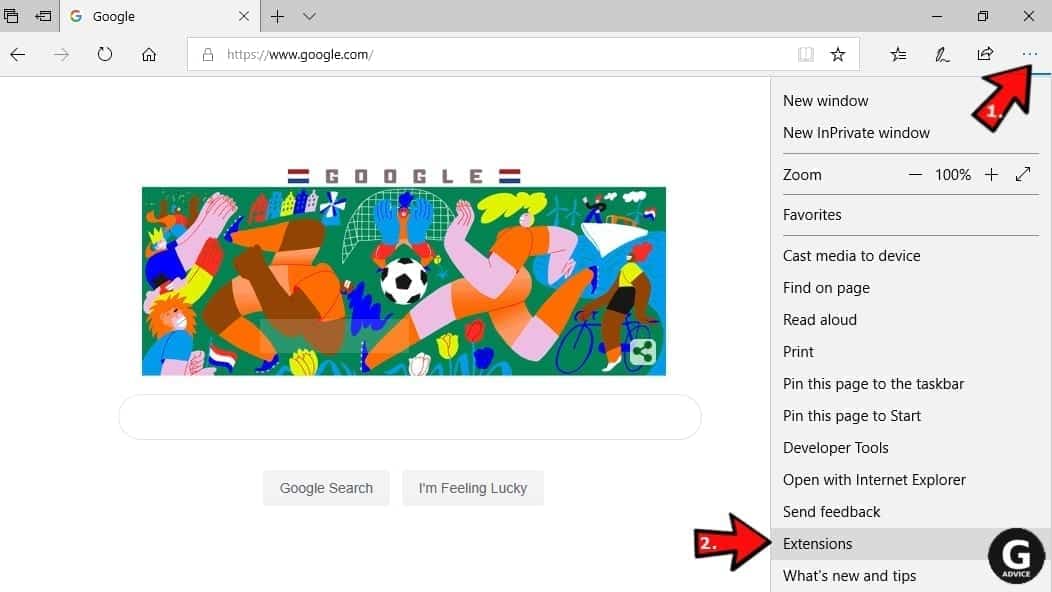
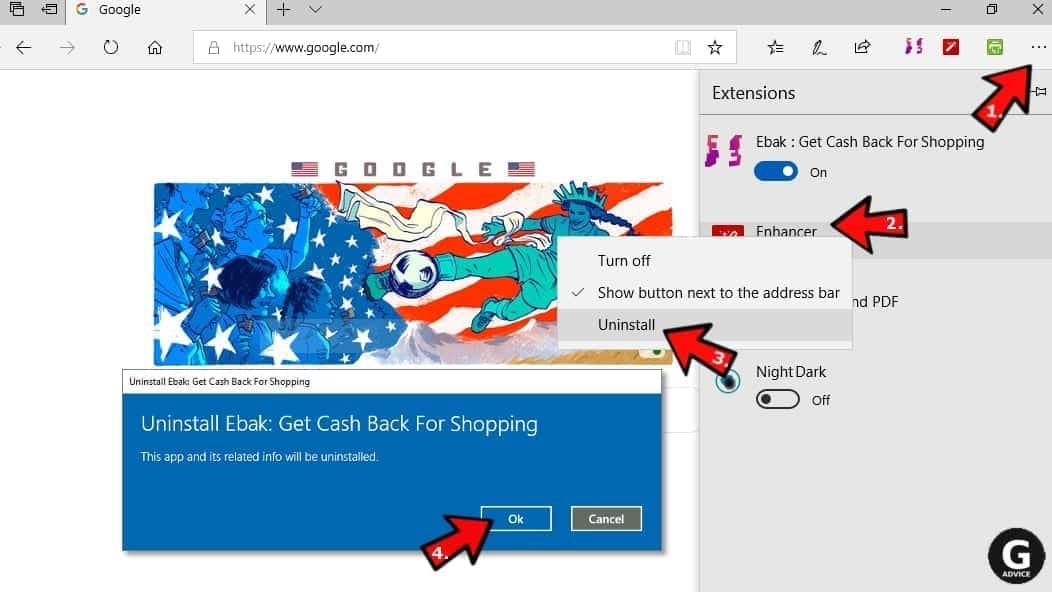
Remove Managed By Your Organization related programs from Microsoft Edge
Remove suspicious extensions:
- Open MS Edge browser and click on the three dots button in the top right corner, then click on Extensions.
- Look through the list of installed extensions and find the ones you can't remember installing or simply suspicious-looking ones. Right-click on them and choose Uninstall. Then confirm by pressing Uninstall again.
Change MS Edge Start Page and default search engine:
- Click on the three dots again and go to Settings. First, make sure that you choose to Open Microsoft Edge with A specific page or pages option. Then click the X next to suspicious URLs and type in the one you want to set as your homepage. Click the Save icon to confirm.
- Click on the three dots > Settings. Scroll down and click on Show Advanced Settings. Then scroll down until you find Change search engine button. Click it. Here, select the search engine you prefer using and click Set as default.
Additionally, we recommend selecting and Removing suspicious search engines.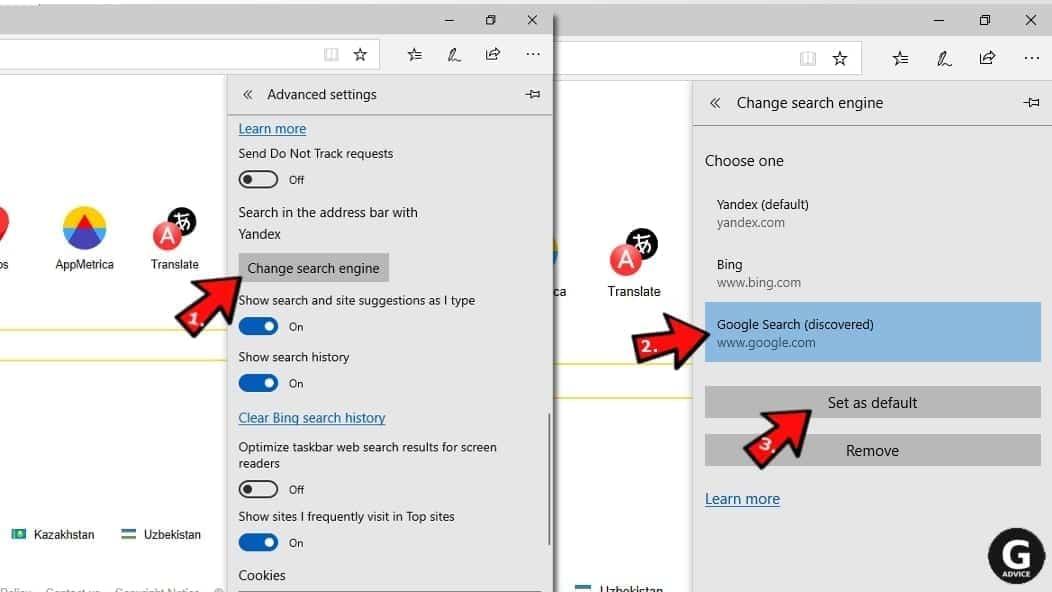
Turn off push notifications in Edge
If you keep receiving pop-up ads or other promotional content while browsing on Microsoft Edge, your browser might be corrupted by a potentially unwanted program (PUP). You have to clean it — follow these easy instructions:
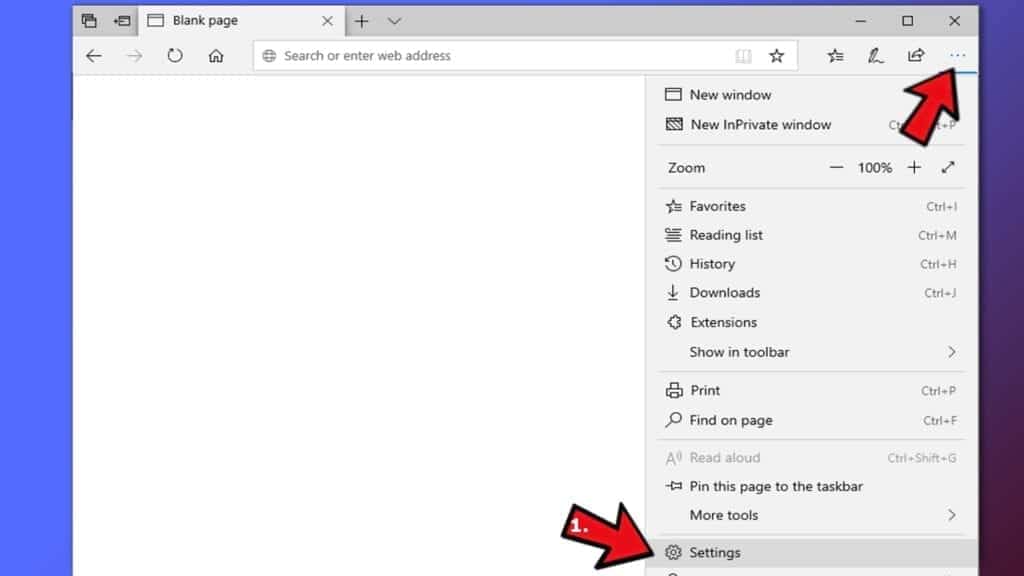
- In Microsoft Edge, open Menu (three horizontal dots) in the top-right corner of the screen and click Settings;
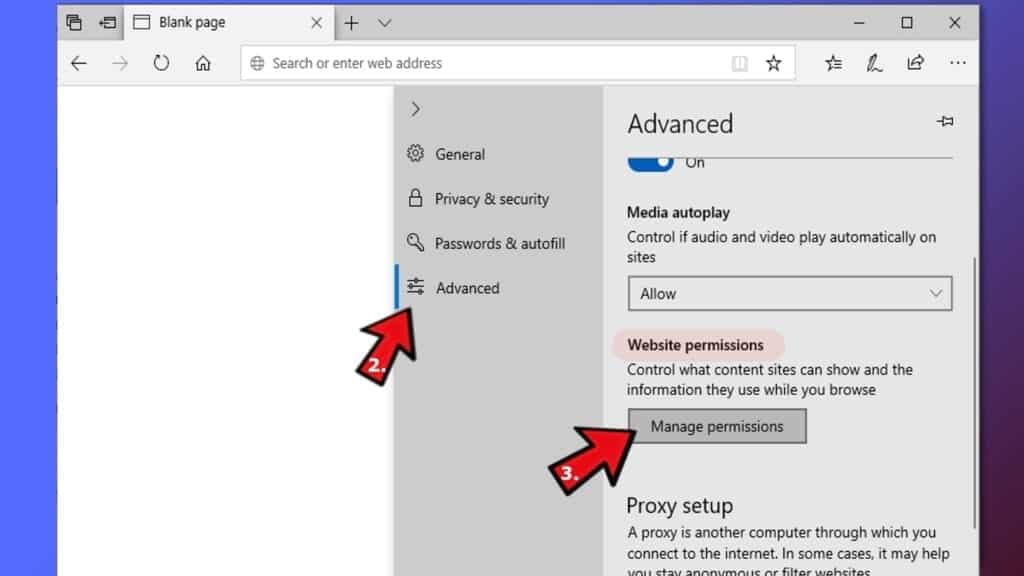
- Click on Advanced settings.
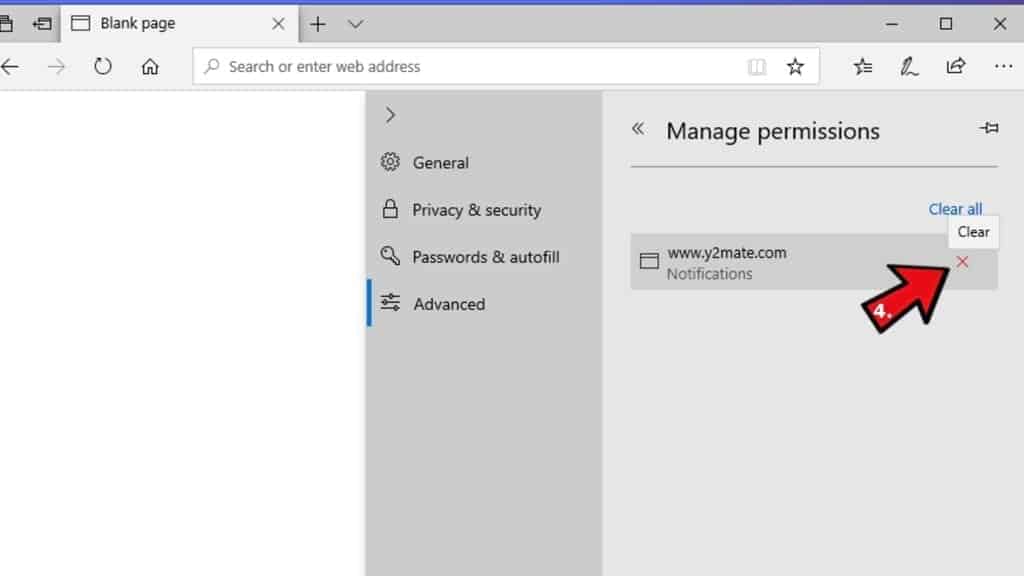
- Scroll down to the Website permissions section. Here, click Manage permissions.
- Find Notifications and Remove all suspicious websites.
Clear browsing data
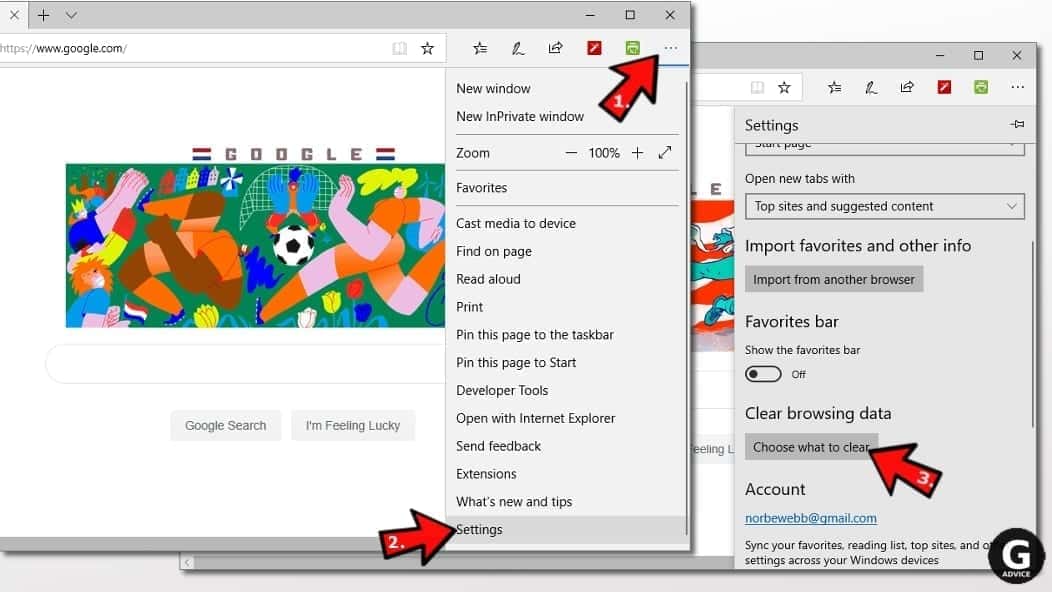
- Click on the three dots in the top right corner again and click on Settings. Find Clear browsing data section and click Choose what to clear button.
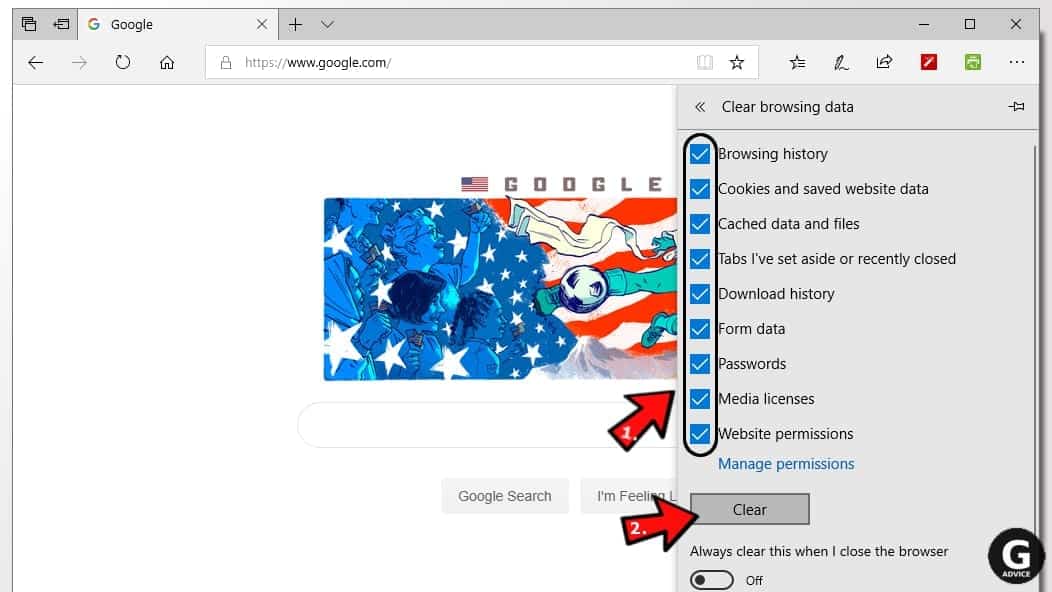
- In the next window, select all options and click Clear.
Remove Managed By Your Organization related programs from Safari
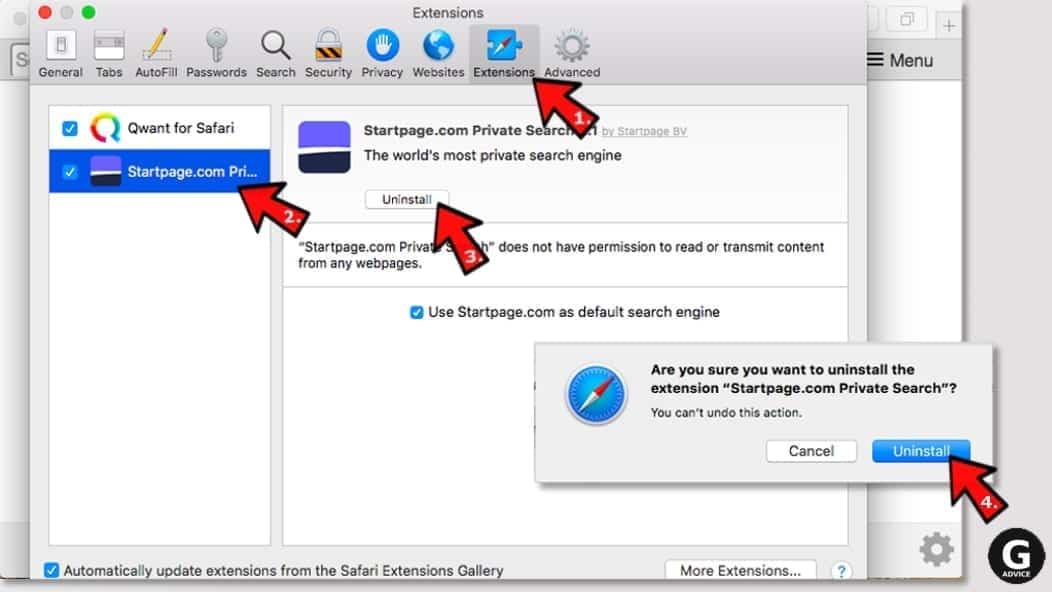
Uninstall suspicious Safari extensions
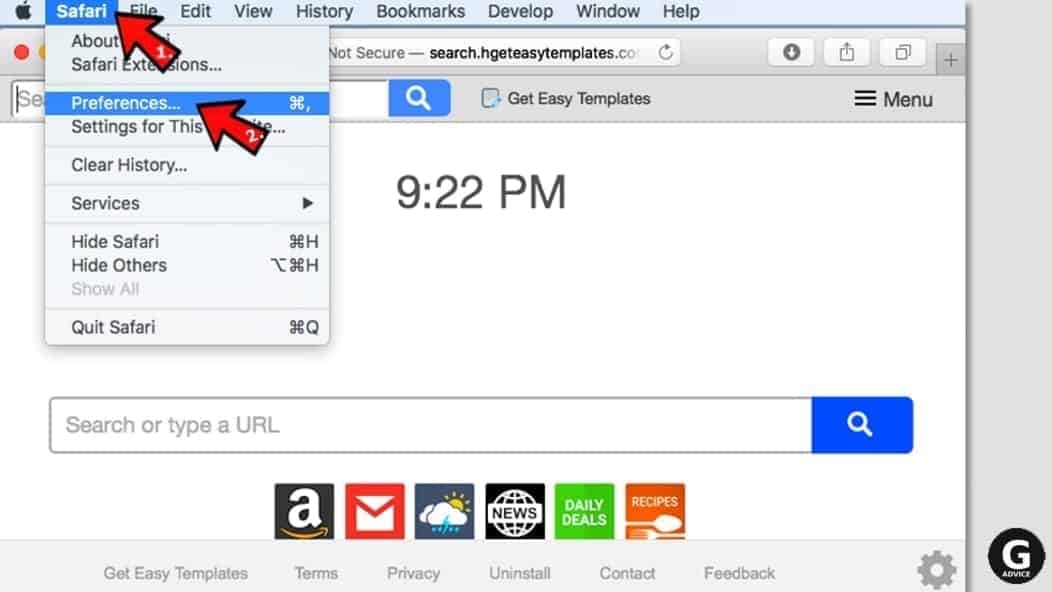
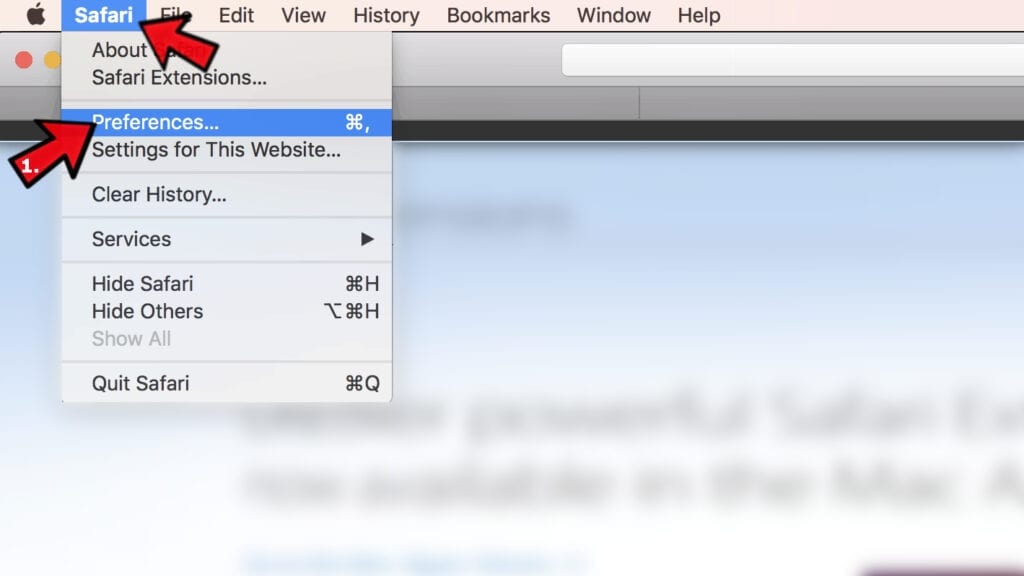
- Open Safari and click on Safari button in the top left corner. Select Preferences in the menu that appears on the screen.
- Now, go to Extensions tab. Look at the left to see all installed extensions, click on suspicious ones and hit that Uninstall button as shown in the picture. Confirm your choice by clicking Uninstall again. Repeat until you get rid of all unwanted extensions.
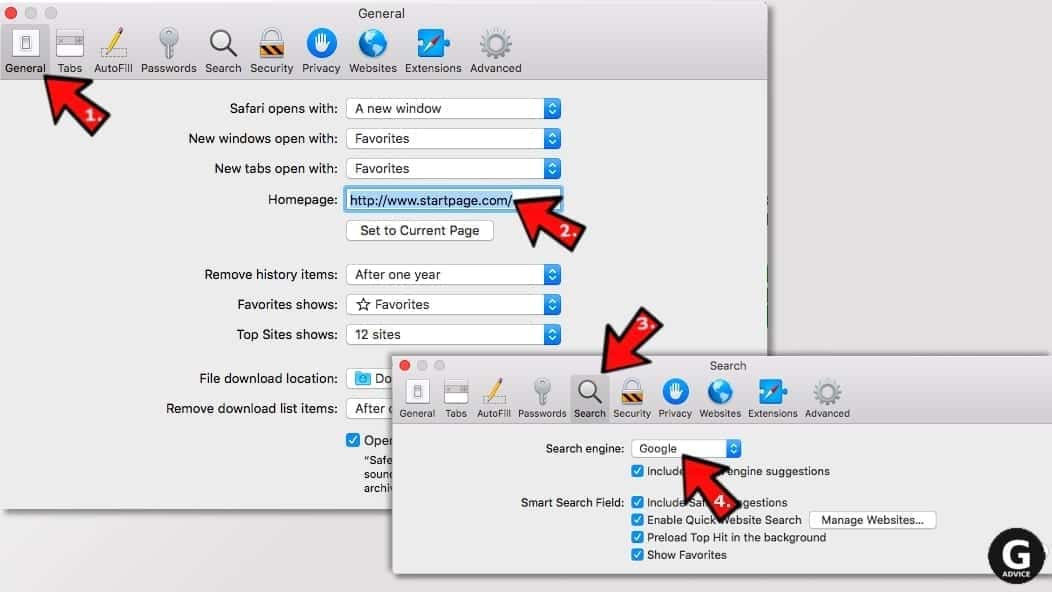
Change Safari Homepage and default search engine
- In Preferences, open the General tab. Here, check what URL is set as your homepage. Delete it and type in whatever URL you want to set as your Safari Start Page.
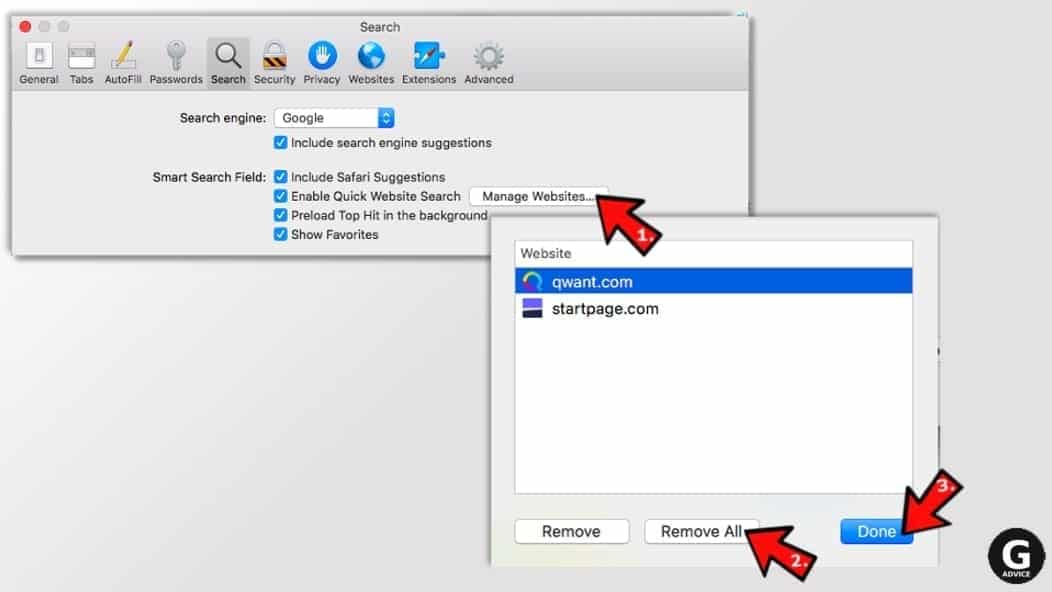
- Next, go to the Search tab. Here, choose what Search engine you want to set as default.
- Next, click on Manage websites... then Remove all... and then Done.
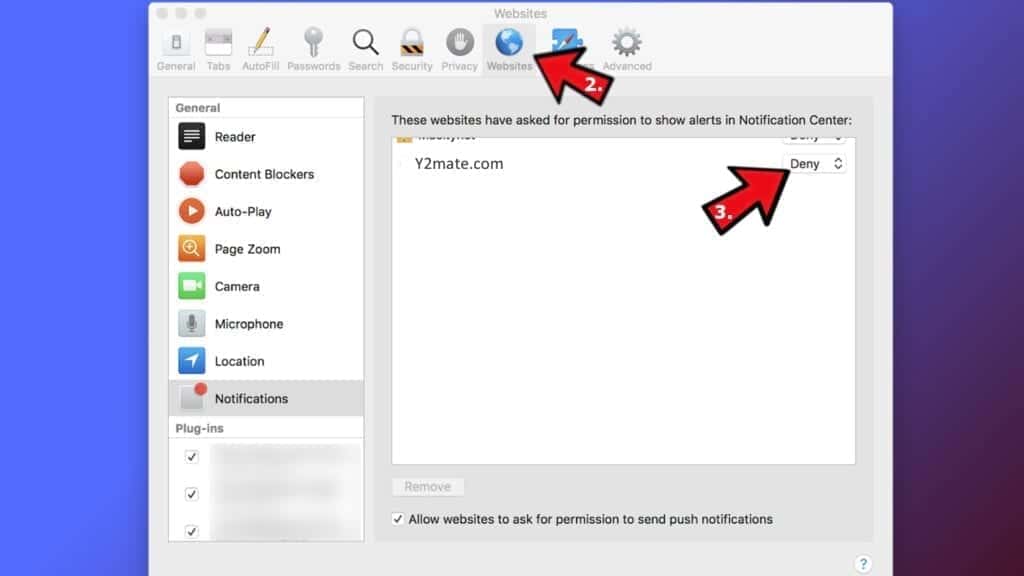
Remove push notifications on Safari
Some suspicious websites can try to corrupt your Safari by asking to enable push notifications. If you have accidentally agreed, your browser will be flooded with various intrusive advertisements and pop-ups. You can get rid of them by following this quick guide:
- Open Safari and click on Safari button in the top-left corner of the screen to select Preferences;
- Go to Websites tab and navigate to Notifications on the left side toolbar.
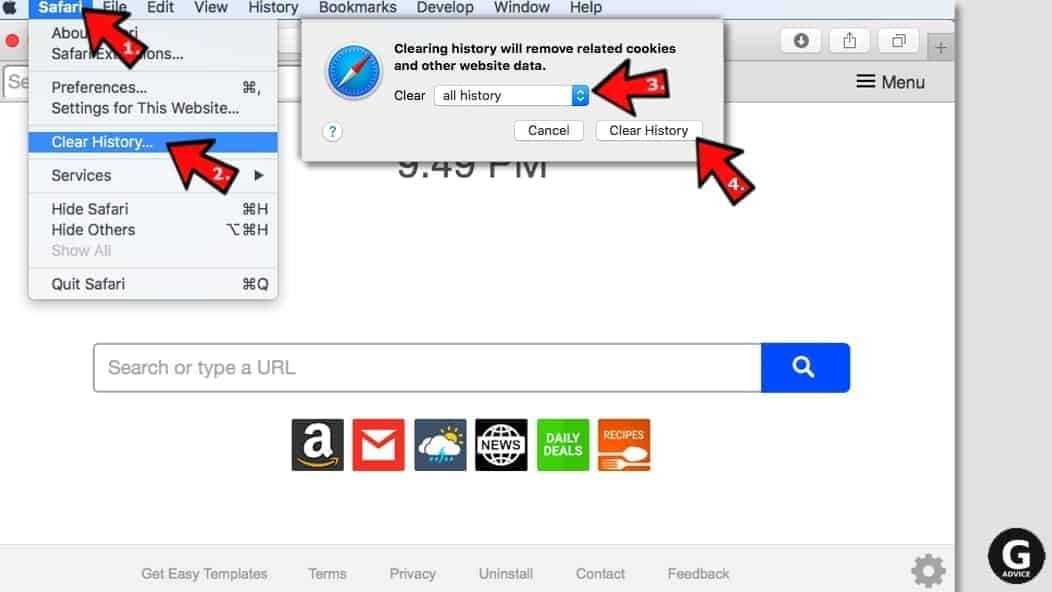
Reset Safari
- Click on Safari > Clear History...
- Then choose to clear All history and hit Clear History button to confirm.
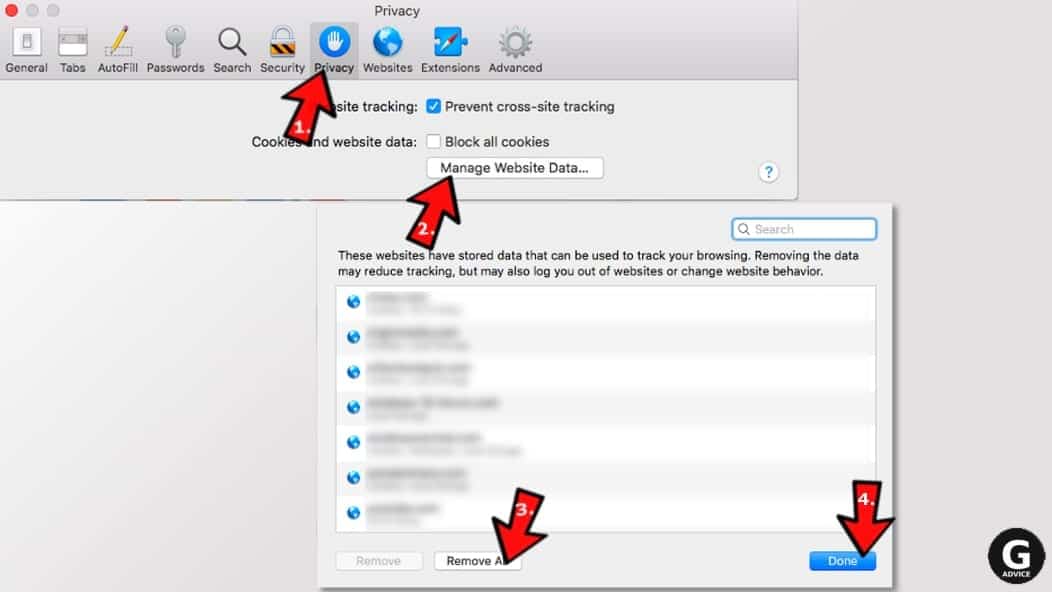
- Go to Safari > Preferences and then open Privacy tab.
- Click Manage Website Data... then Remove All. To finish, click Done.
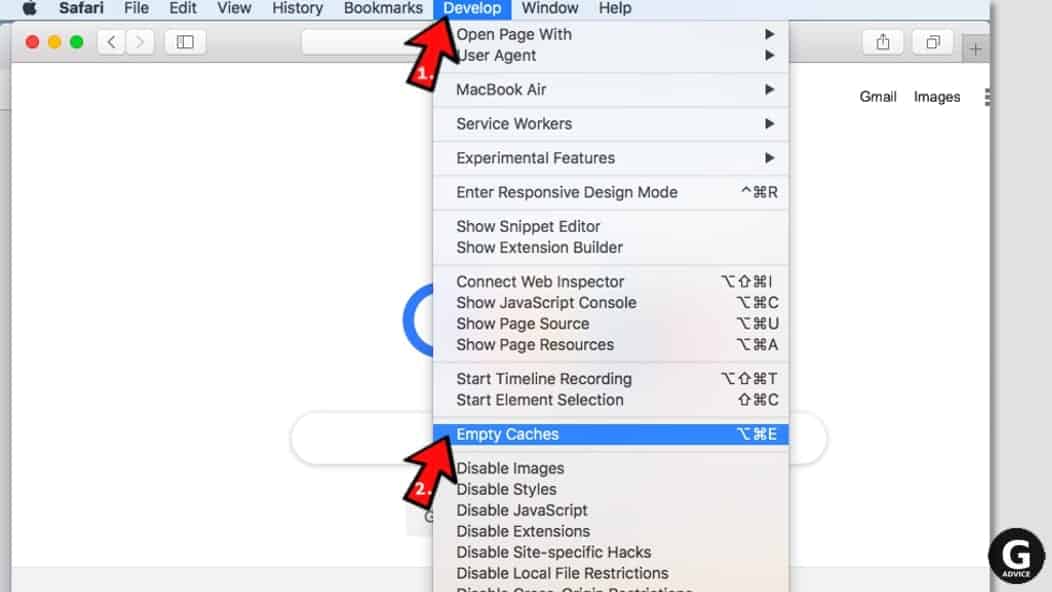
- Finally, clear Safari cache. In Safari Menu, click Develop > Clear Cache.
Remove Managed By Your Organization related programs from Internet Explorer
TIP: If you are still using IE, we strongly advise using Microsoft Edge or a different browser because Microsoft is no longer providing technical or security support for IE browser.
Remove suspicious extensions from IE
- Now, go back to Toolbars and Extensions.
- Below Show:, select All add-ons.
- Right-click suspicious extensions and choose Disable, or, if available - Remove.
- If any pop-up appears, confirm your choice.
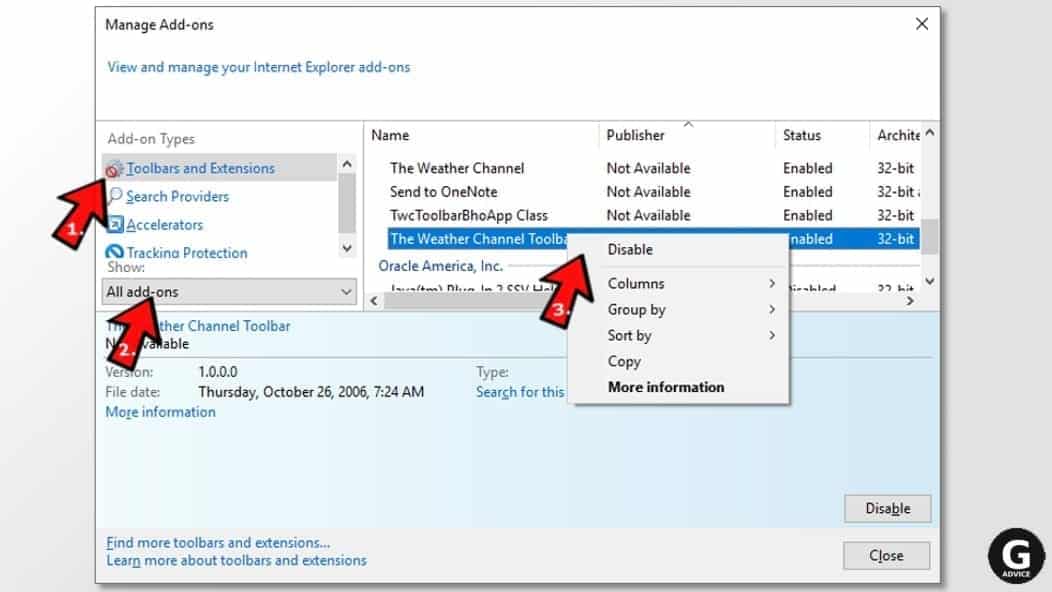 Tip: If you can't find any suspicious extensions, most likely you have uninstalled them via Programs and Features already. This mostly applies to IE browser.
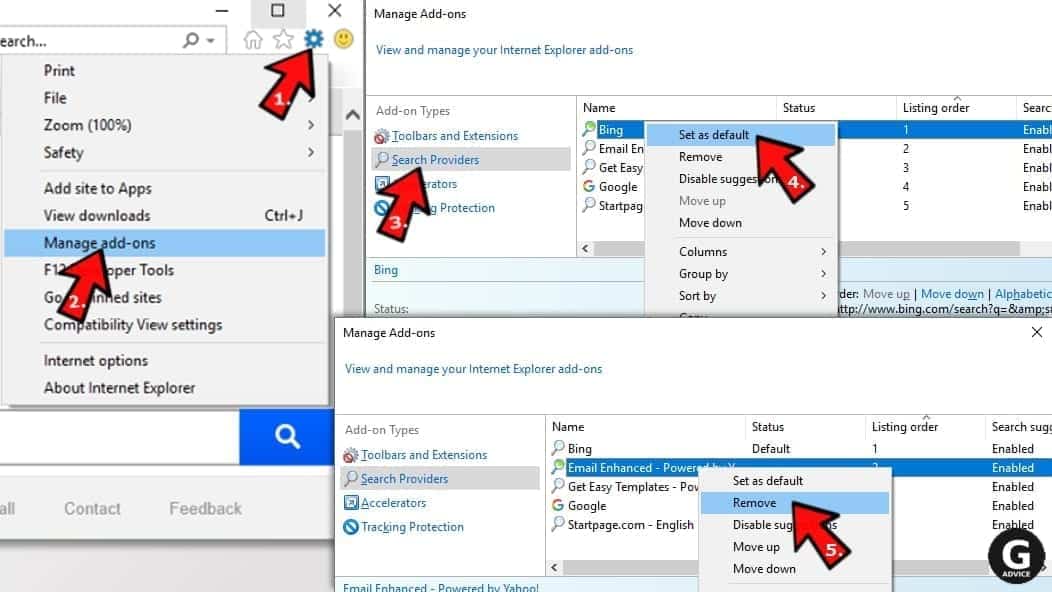
Change default search provider and remove suspicious ones
- Open Internet Explorer and click on the gear icon in the top right of the window.
- Then select Manage Add-ons.
- Here, click on Search Providers tab.
- Here, we recommend setting Bing, Google or another trusted and well-known search provider as default. To do it, right-click the provider and choose Set as default.
- Now you can right-click suspicious search providers and choose Remove.
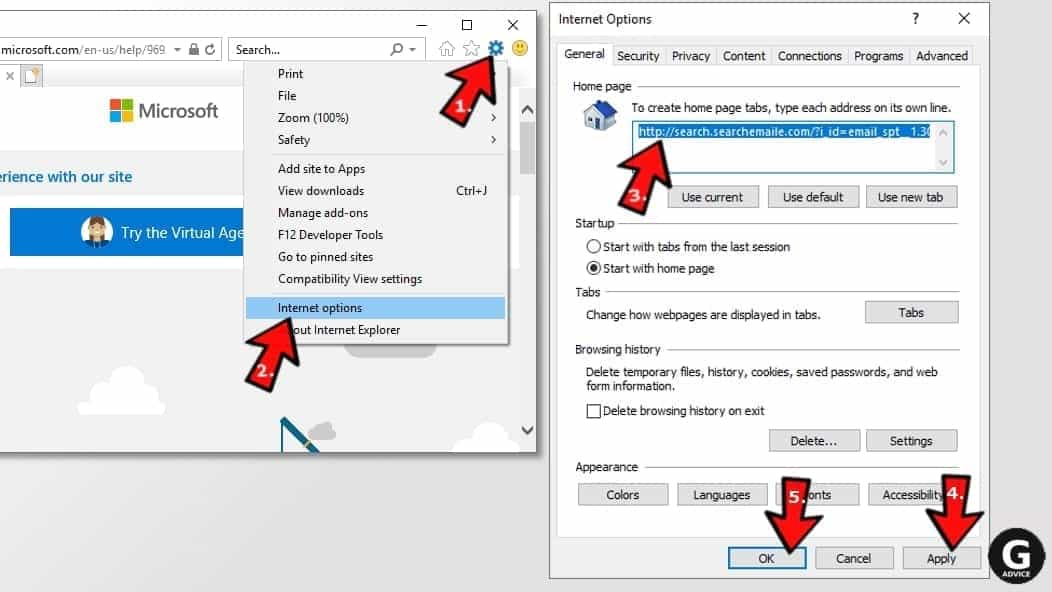
Change IE Home Page
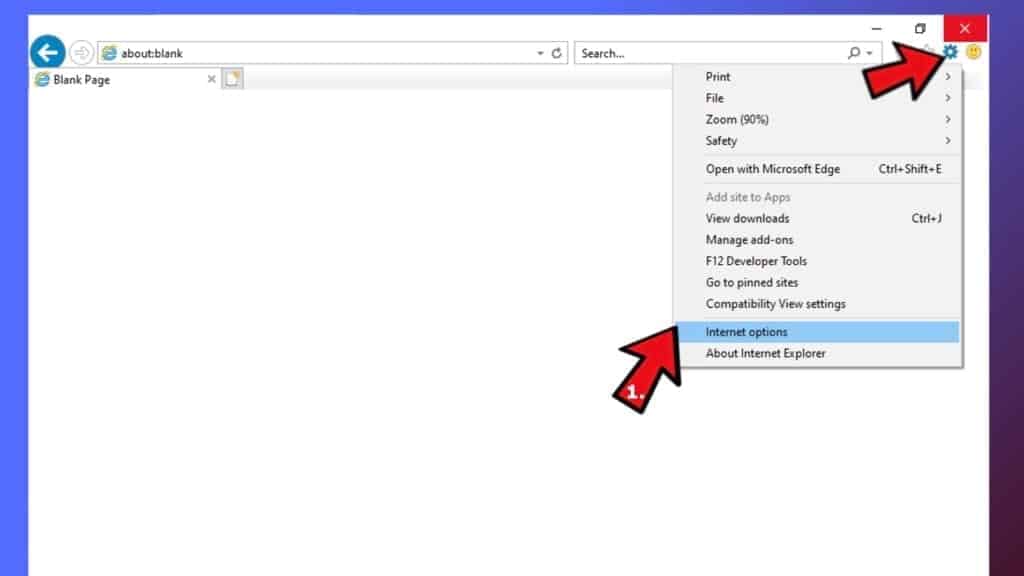
- In Internet Explorer, click the gear icon in the top left corner.
- Choose Internet Options.
- Change Home Page URL to whatever page you want to use as your homepage.
- Click Apply.
- Click OK.
Block pop-up notifications on Internet Explorer
Suspicious websites can gain access to your Internet Explorer browser through push notifications. If you enable them even by accident, you will start receiving numerous annoying ads and other advertising content while browsing. The easiest way to remove push-notification viruses is by performing the following steps:
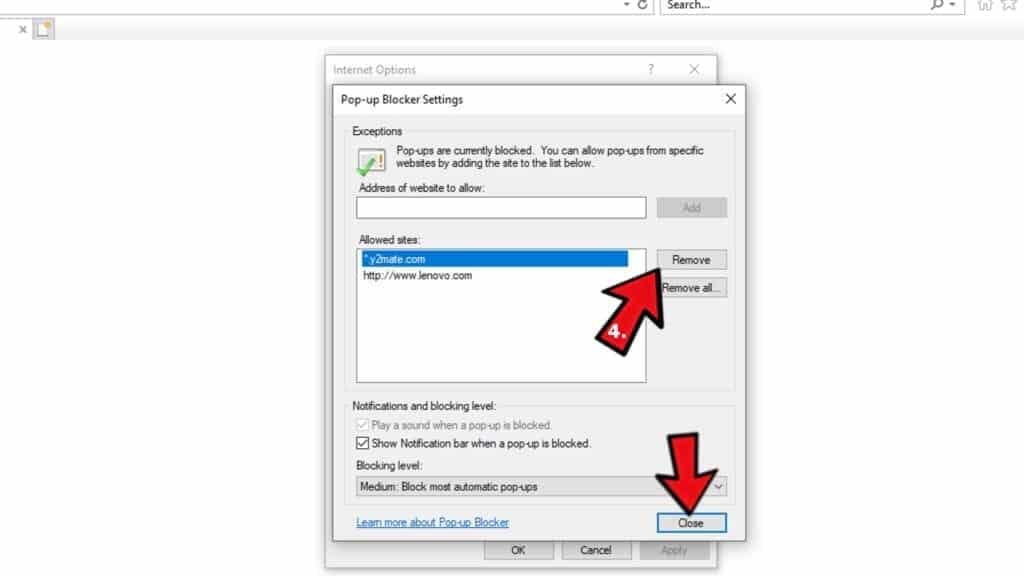
- In Internet Explorer, click on the Menu (the gear button) on the top-right corner of the window, then select Internet Options.
- Go to the Privacy tab;
- Look for Pop-up Blocker section and select Settings;
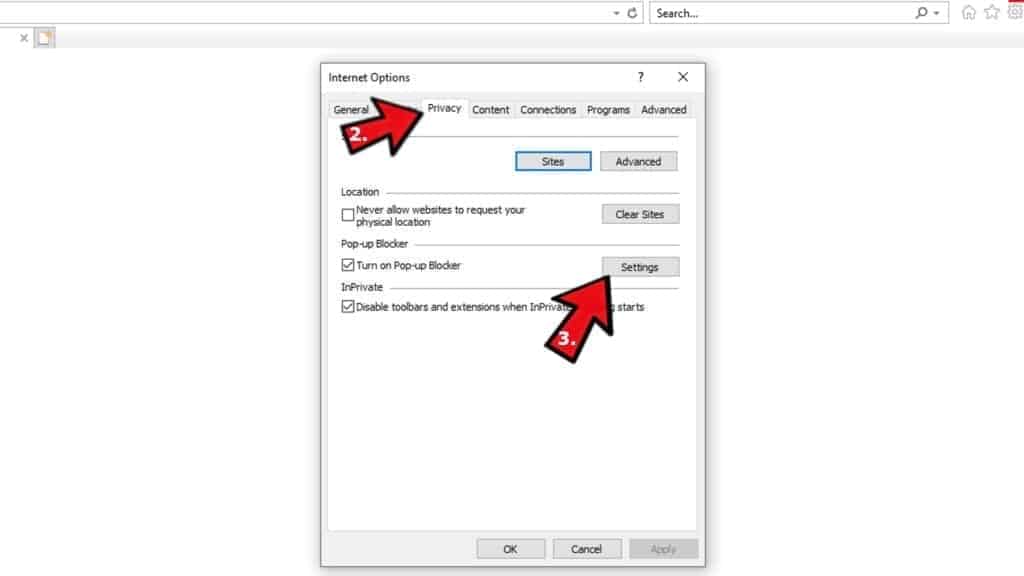
- Scroll through all URLs and you can Remove them one by one or all at the same time. Click Close.
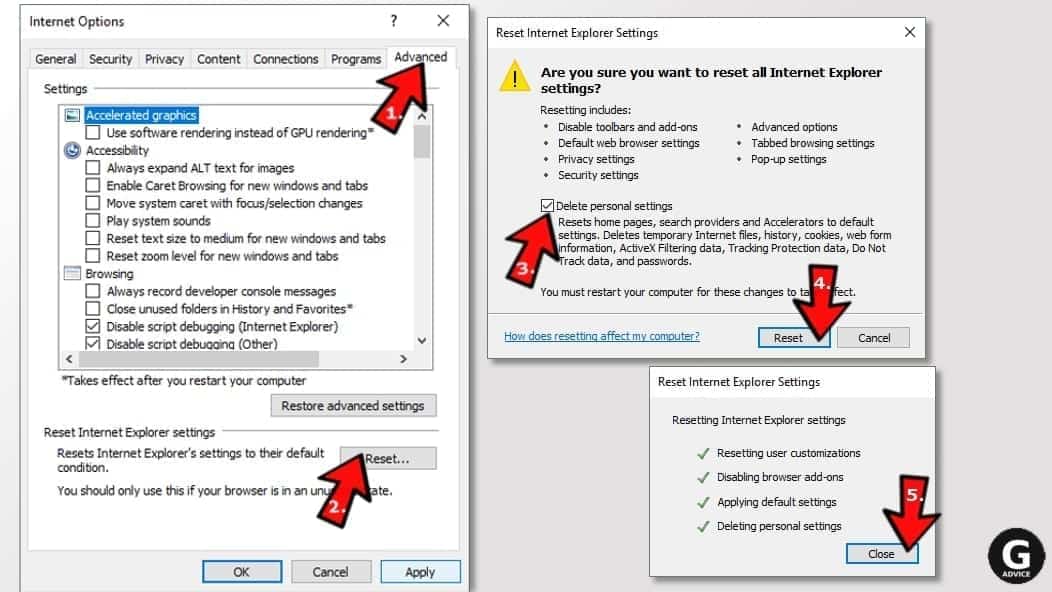
Reset Internet Explorer
- Click the gear icon in IE menu > Internet Options. Now click on Advanced tab.
- Under Reset Internet Explorer settings, click Reset...
- Click on the checkbox next to Delete personal settings.
- Click Reset.
- To finish, click Close.
Alternative software recommendations
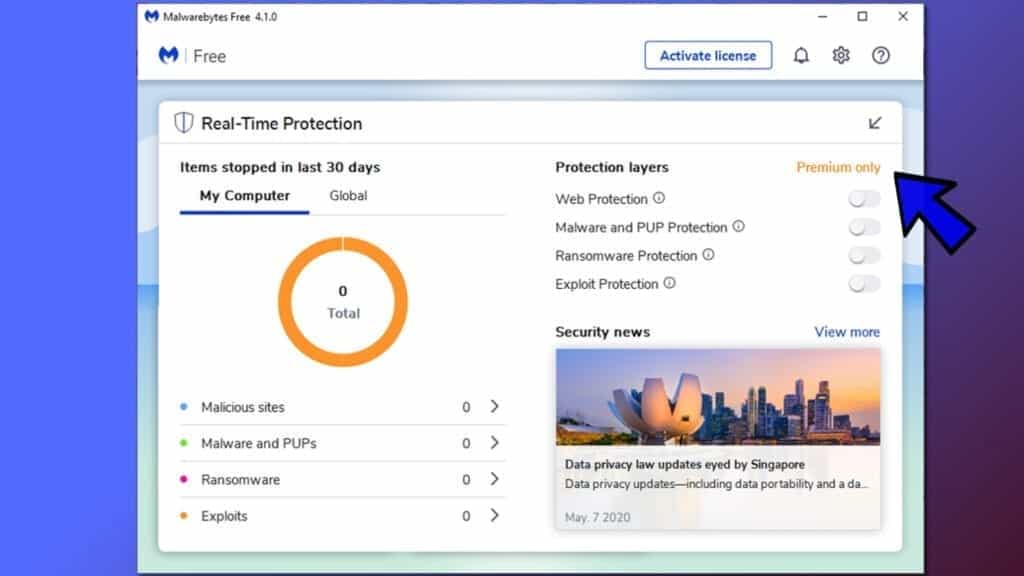
Malwarebytes Anti-Malware
Removing spyware and malware is one step towards cybersecurity. To protect yourself against ever-evolving threats, we strongly recommend purchasing a Premium version of Malwarebytes Anti-Malware, which provides security based on artificial intelligence and machine learning. Includes ransomware protection. See pricing options and protect yourself now.
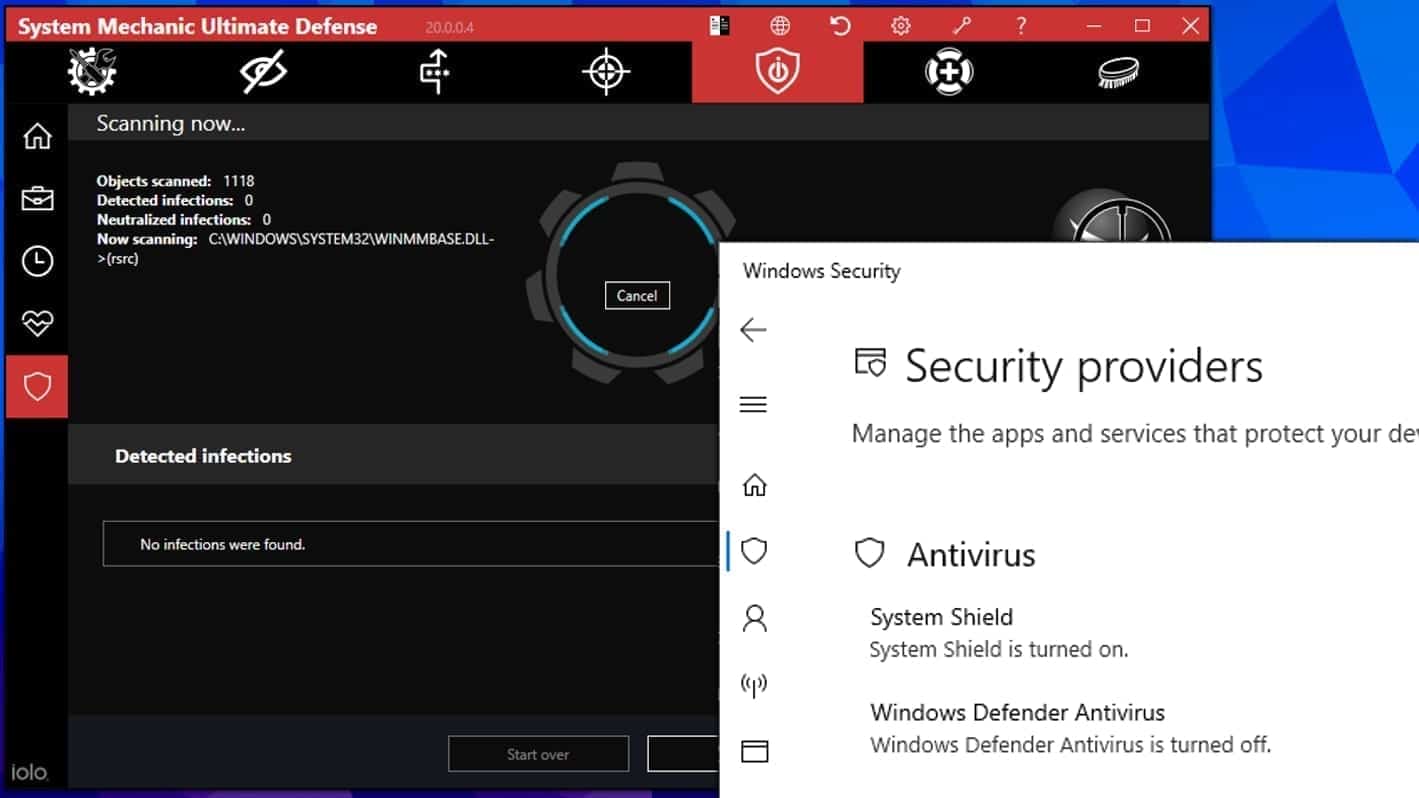
System Mechanic Ultimate Defense
If you're looking for an all-in-one system maintenance suite that has 7 core components providing powerful real-time protection, on-demand malware removal, system optimization, data recovery, password manager, online privacy protection and secure driver wiping technology. Therefore, due to its wide-range of capabilities, System Mechanic Ultimate Defense deserves Geek's Advice approval. Get it now for 50% off. You may also be interested in its full review.
Disclaimer. This site includes affiliate links. We may earn a small commission by recommending certain products, at no additional cost for you. We only choose quality software and services to recommend.

Norbert Webb is the head of Geek’s Advice team. He is the chief editor of the website who controls the quality of content published. The man also loves reading cybersecurity news, testing new software and sharing his insights on them. Norbert says that following his passion for information technology was one of the best decisions he has ever made. “I don’t feel like working while I’m doing something I love.” However, the geek has other interests, such as snowboarding and traveling.
Leave a Reply